WordPress Settings: A Complete Screen-By-Screen Guide (2025)

WordPress is about as flexible and powerful as an Olympic gymnast. You can ask it to perform any task, and the platform will put on a medal-winning performance.
The challenge is knowing how to get the version of WordPress you want. With so many settings, it’s not easy to identify which boxes to check and which dropdowns to change.
To help you navigate through the forest of options, we decided to take a closer look at WordPress settings.
Well…that’s underselling it, actually. This guide is a complete screen-by-screen walkthrough, helping you understand every option in forensic detail.
Ready to sweat the small stuff? Keep scrolling to jump right in!
Getting To Know WordPress Settings
The “Settings” area of your WordPress dashboard is a central hub for the tools that define, customize, and control the various sections of your site.
While plugins often add further options, there are seven main areas to traverse.
1. General Settings: Setting Your Site’s Foundations
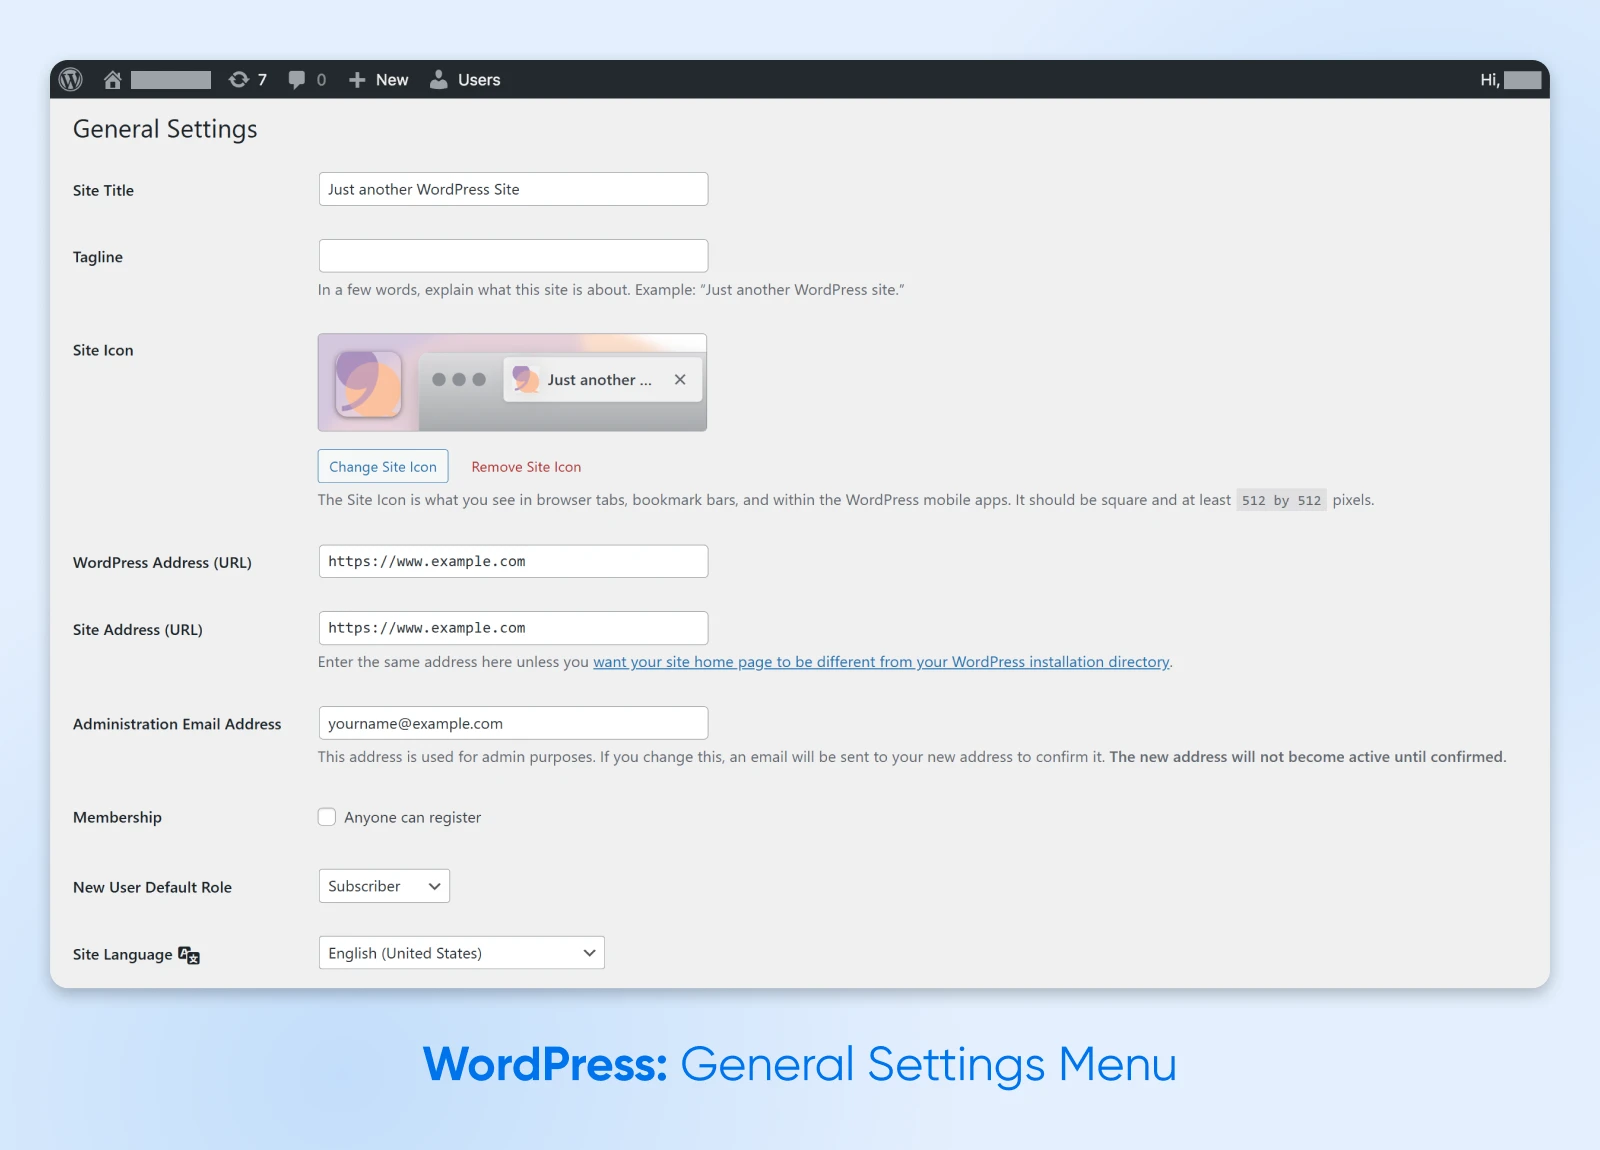
First up is the “General” screen.
The settings here allow you to customize the basic, overarching elements of your site.
Site Branding
First up, you can set your “Site Title” and “Tagline.”

The former will show up in the title bar of your browser and search engines once your site is published. The latter is usually displayed underneath your site’s title and is a short explanation of what your site is about.
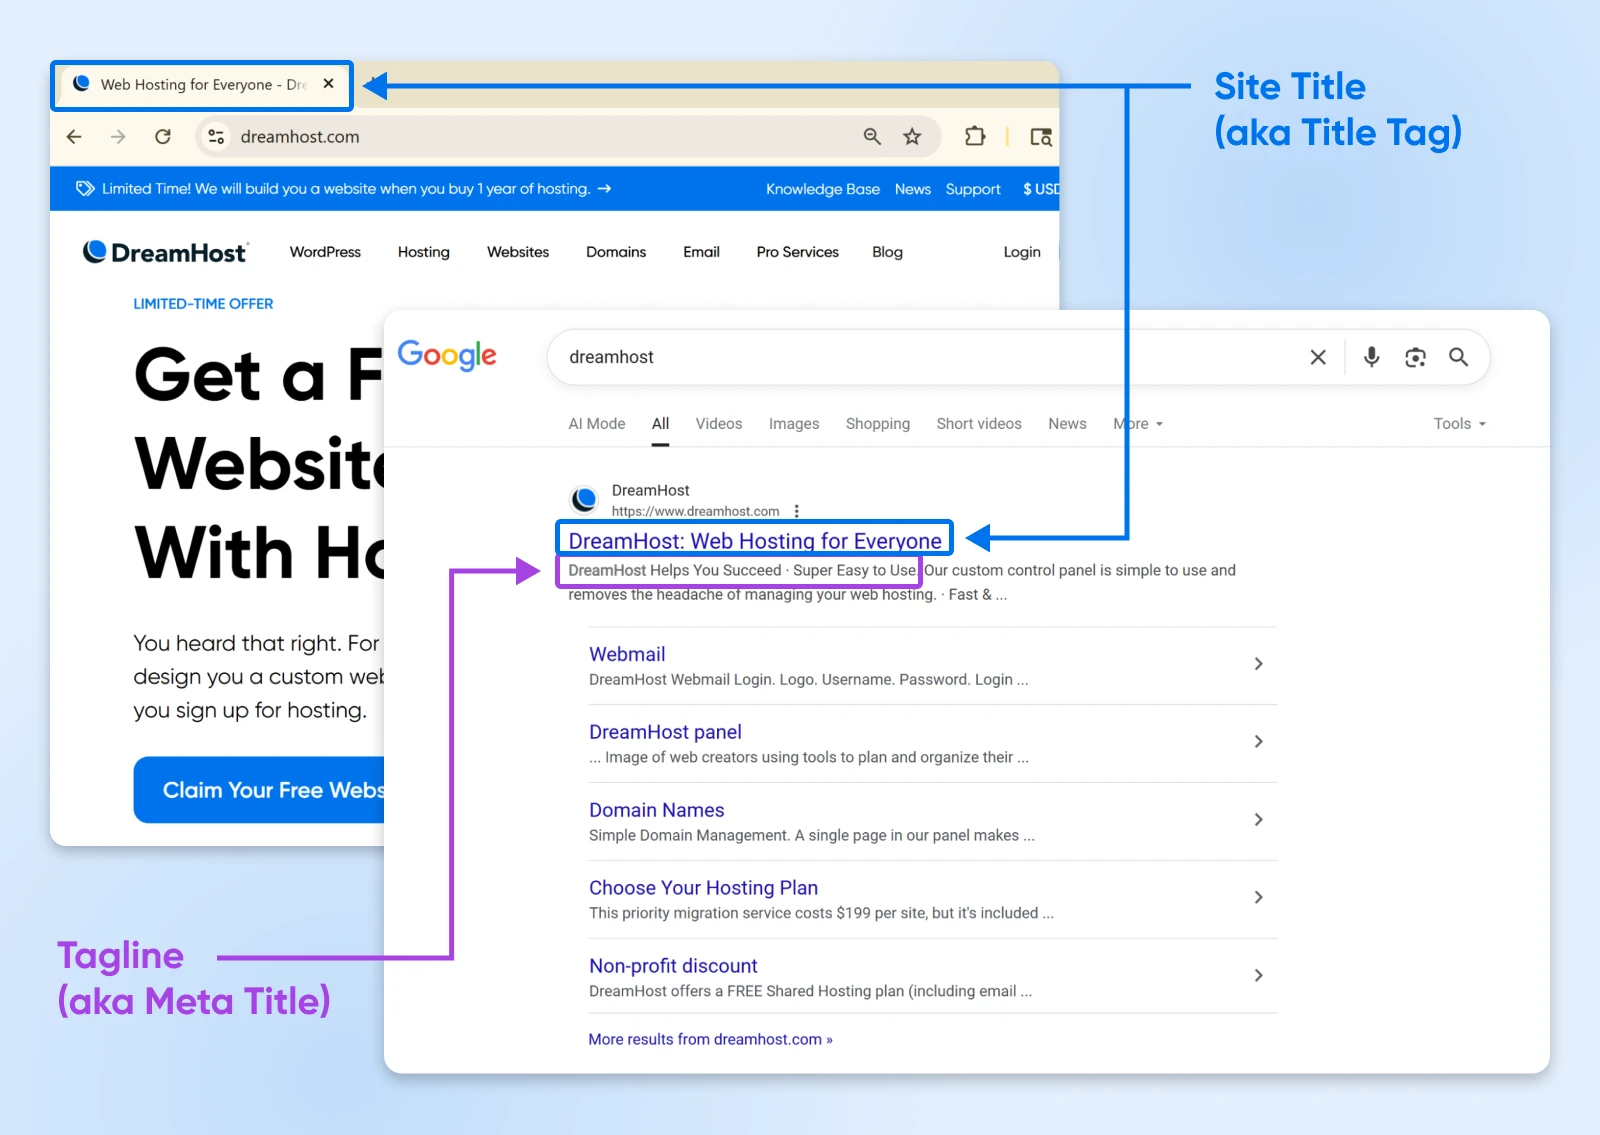
Both elements provide an excellent opportunity for improving your site’s search engine optimization (SEO). For example, you could include terms related to the topic of your site in the Tagline.
In this section, you can also upload your “Site Icon.” This is the little picture that appears in browser tabs when your site is loaded. Not essential, but a nice addition.
WordPress and Site Address
Moving down, we have boxes for your “WordPress Address (URL)” and “Site Address (URL).”

These are usually the same; they would only differ if you’re using WordPress in a subdirectory of your main site or you’re doing a little staging.
The “Email Address” field lets you choose the primary address to which admin-specific emails should be sent. We’d always recommend choosing your main personal or work email; that way, you won’t miss any important notifications.

User Options
Next up are the basic user registration options.

The “Membership” checkbox toggles whether anyone can register on your site. Uncheck this unless you want to build a community on your site.
Want people to sign up? The “New User Default Role” drop-down menu sets a default role for any new site users. We recommend sticking with “Subscriber” initially, as this offers the least amount of site access.
Site Language

The “Site Language” menu lets you set the mother tongue of your WordPress dashboard.
Bear in mind that this doesn’t affect what visitors see; it’s only about what you see while managing your site.
Time and Date
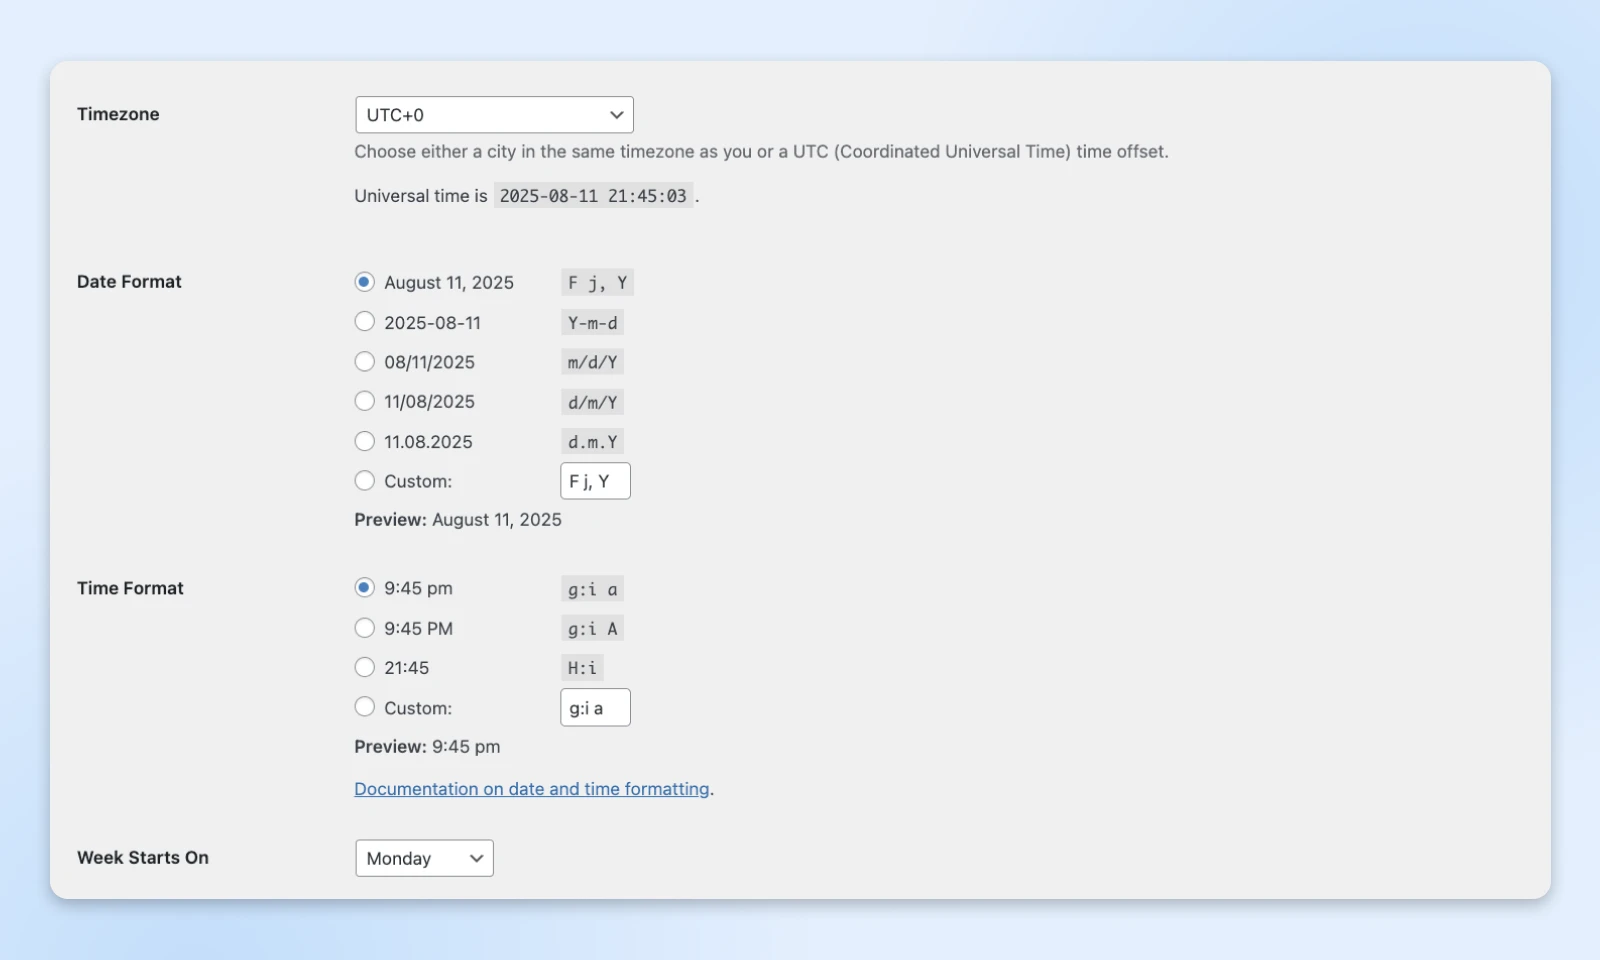
The final grouping is centered around time. You can select a “Timezone,” along with your preferred “Date Format” and “Time Format.” Make your choice based on your business location or where most of your visitors are.
The “Week Starts On” drop-down lets you choose any of the seven days to start your week!
Once you’ve made your updates, click on Save Changes. You should see your changes applied immediately. But wait! You’re not done yet…
2. Writing Settings: Configure Your Content
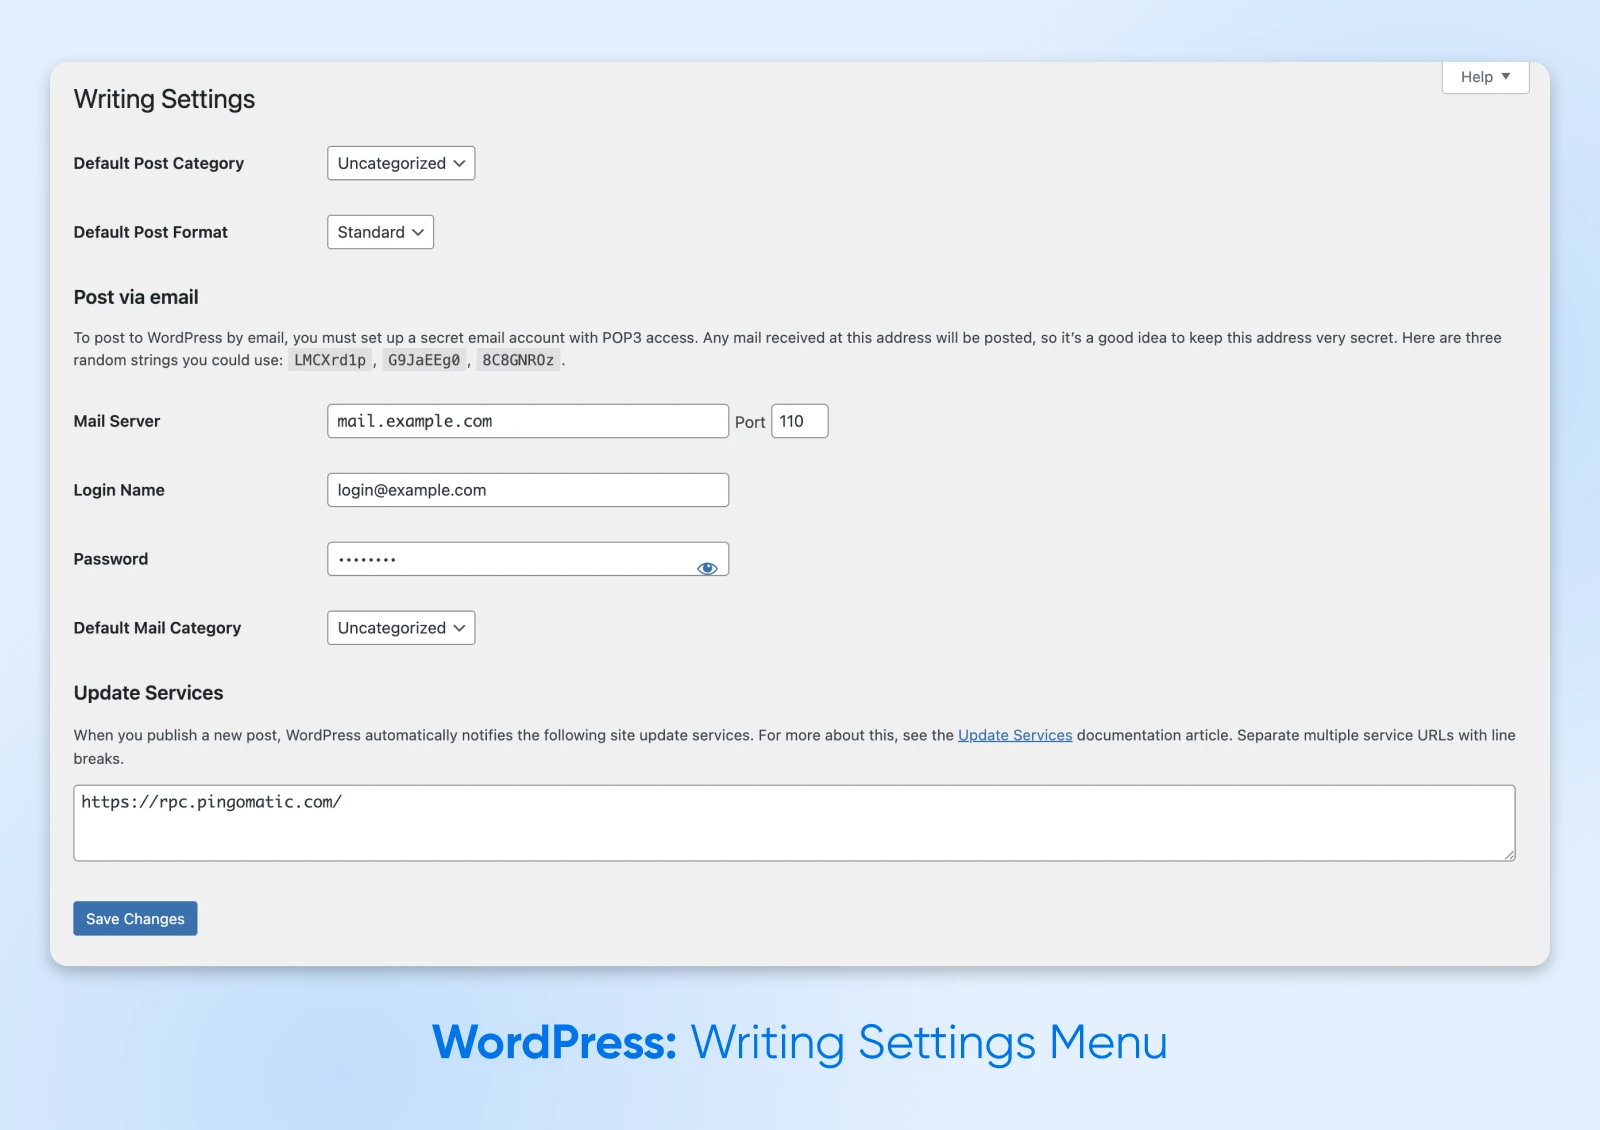
The “Writing” screen is focused on default formatting options for your posts and pages editor screens.
These options are divided into three parts:
Post Settings
The first part relates to post formatting. These dropdowns allow you to set the “Default Category” and “Default Format” for posts you write.

The category choice is mainly about organizing your content. If you would prefer something more specific than “Uncategorized,” be sure to make the change!
You’ll only need to change the default post format if your WordPress site isn’t a blog. For instance, you could make new image or video posts by default if your site is a portfolio.
Post via Email
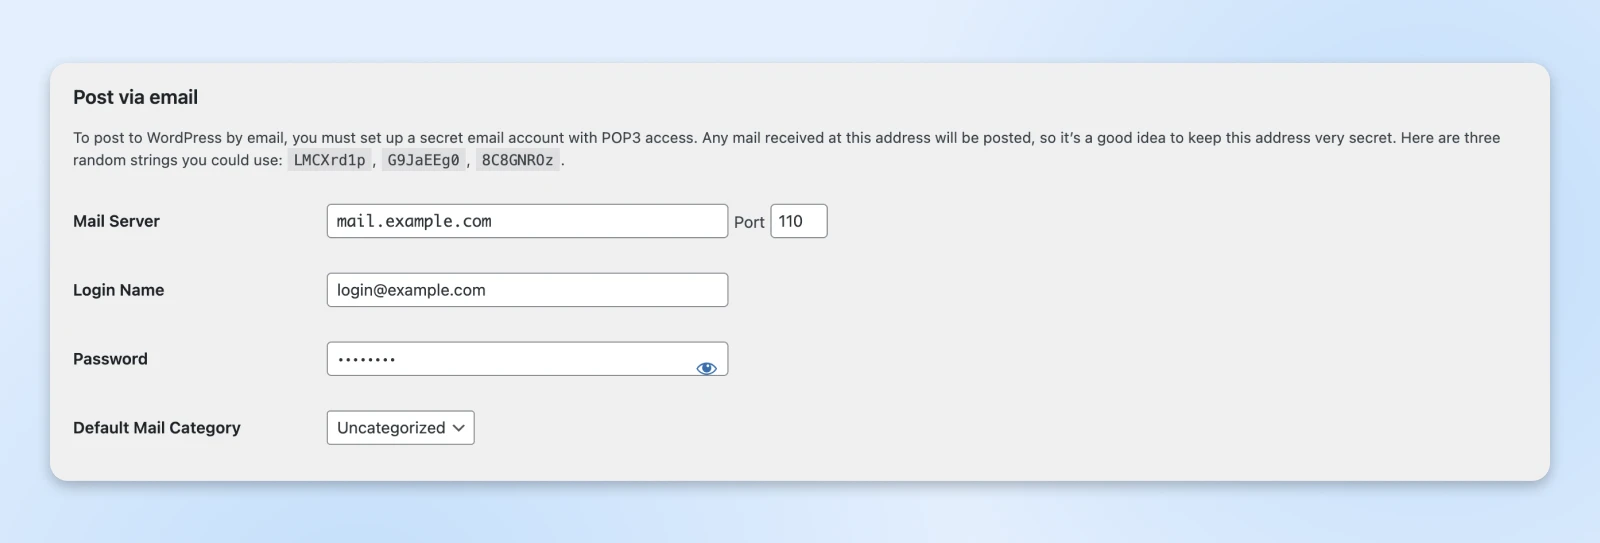
For the time being, WordPress still supports posting articles via email. The next section allows you to configure this feature. It’s much like setting up an email client; you just put in your SMTP details.
But don’t get too attached. This feature is already deprecated (no longer recommended), and it will be removed for future versions very soon.
If you still want to publish via email, you can use the Post by Mail tool in Jetpack or grab the Postie Plugin.
Update Services
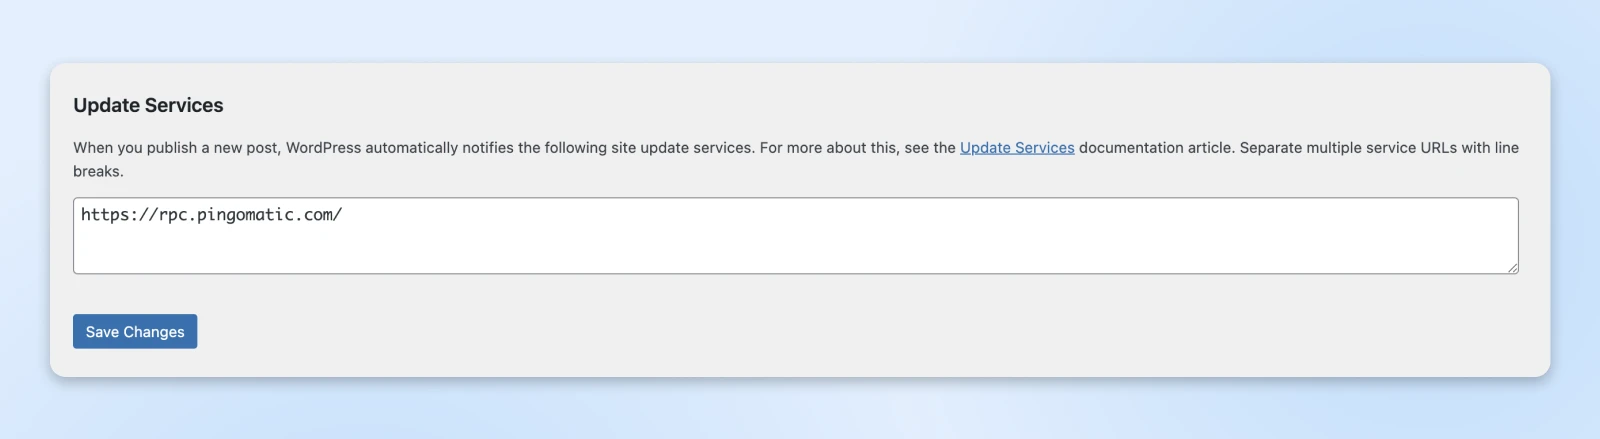
Your most devoted readers want to know whenever you publish a new post, right?
Well, good news! WordPress lets you notify users via XML-RPC ping services. The “Update Services” box lets you select the services you want to use.
The most popular is Ping-o-Matic — partly because this platform can alert multiple other services, including search engines. You can see a list of other popular providers in the official WordPress documentation.
3. Reading Settings: Control How Visitors Experience Your Site
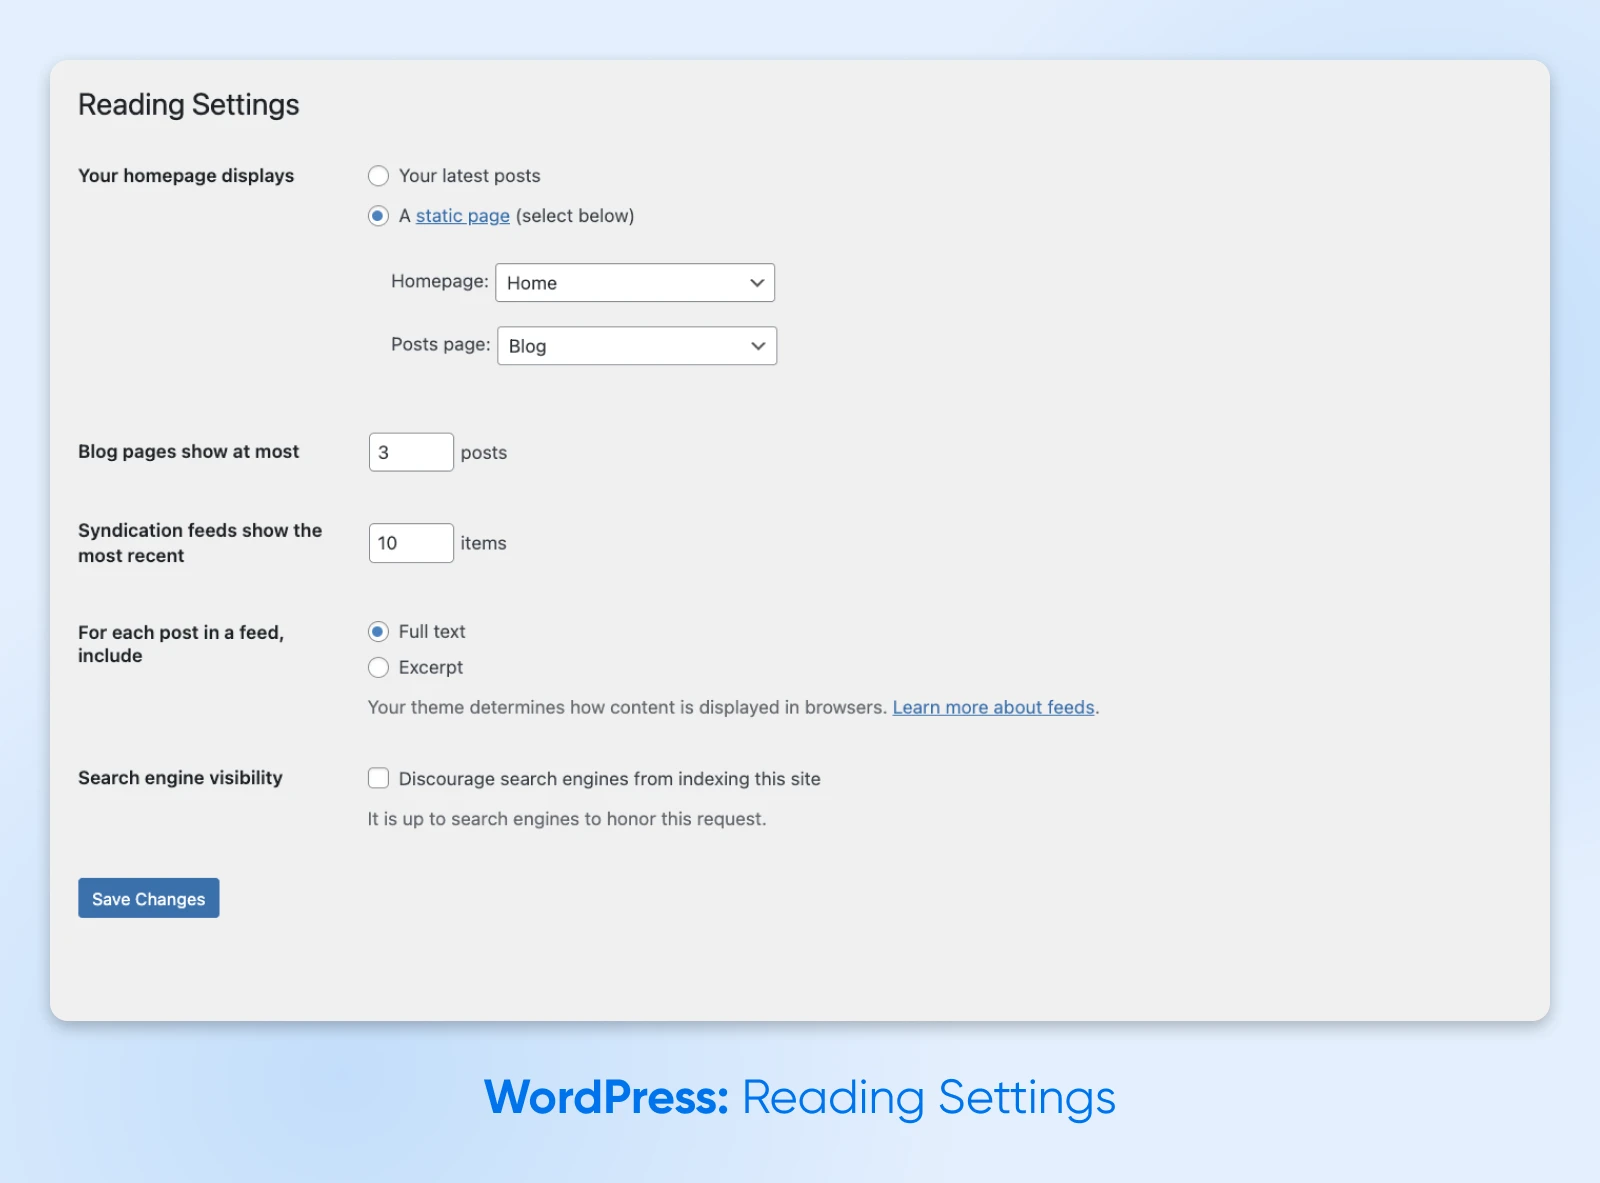
The “Reading” screen is all about how visitors will see your site. You’re not bombarded with options here, but each choice makes a big difference.
Homepage Display Settings
What kind of homepage do you want? By default, WordPress will serve up your latest posts. But if you want to greet visitors with something different, click on the Your homepage displays option.
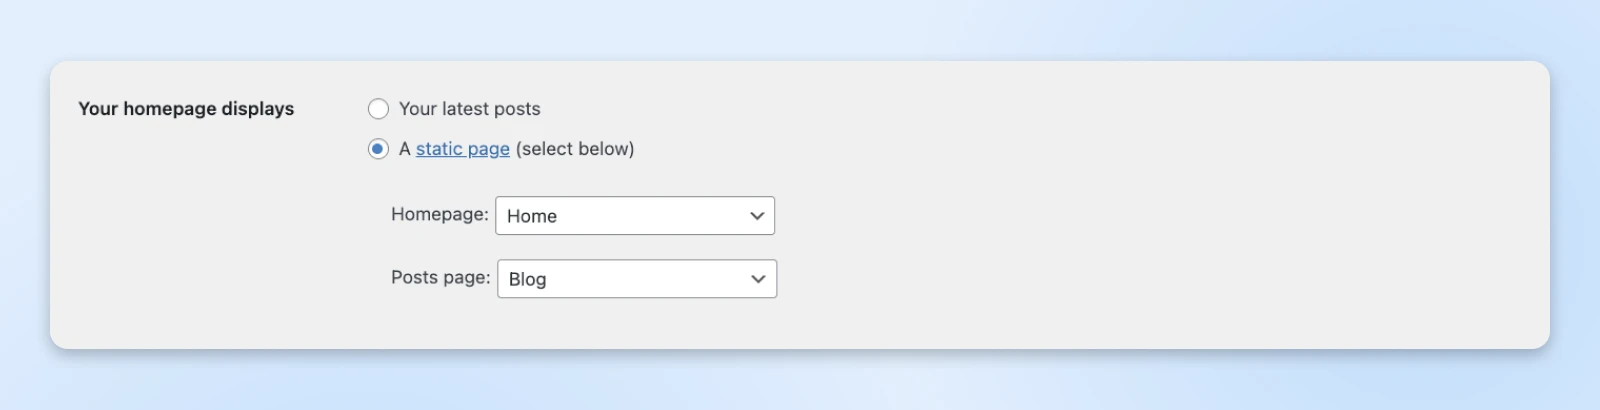
If you’d like users to land on a specific page, click on A static page (select below) and choose both a “Homepage” and a “Posts page” from the drop-downs.
Blog Settings
The next batch of options is about how your content is displayed and shared.
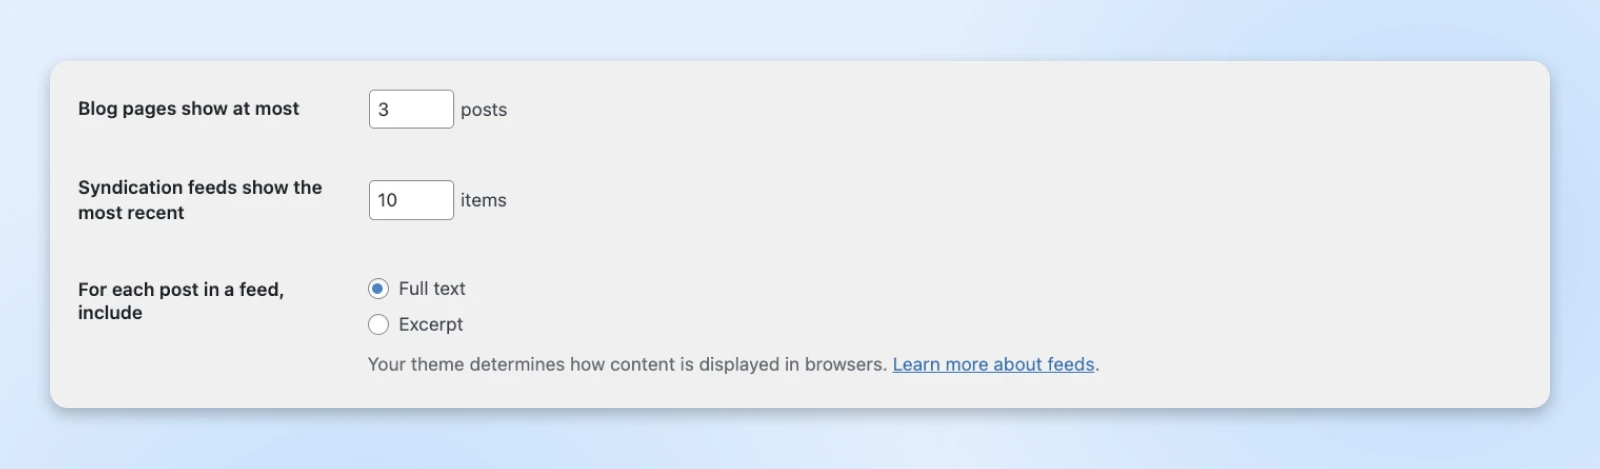
The “Blog pages show at most” box controls how many posts should be loaded at first, before users hit the “older posts” button. Use a low number (<8) if you want good loading speed.
If you’re regularly publishing content, some people might follow your site via RSS feeds. The “Syndication feeds show the most recent” box gives you control over how many posts will appear in RSS clients.
If you want to encourage people to actually visit your site for the latest posts, you could set a low number. Another option is to show only a summary of each post in RSS feeds; enable this via the For each article in a feed, include setting.
Search Engine Visibility

Creating a secret stash of amazing content? The “Search Engine Visibility” checkbox lets you ask search engines not to index your site. They don’t have to comply, but most do.
Our recommendation is to leave this checked until you’re ready to publish your site.
4. Discussion Settings: Managing Comments and Engagement
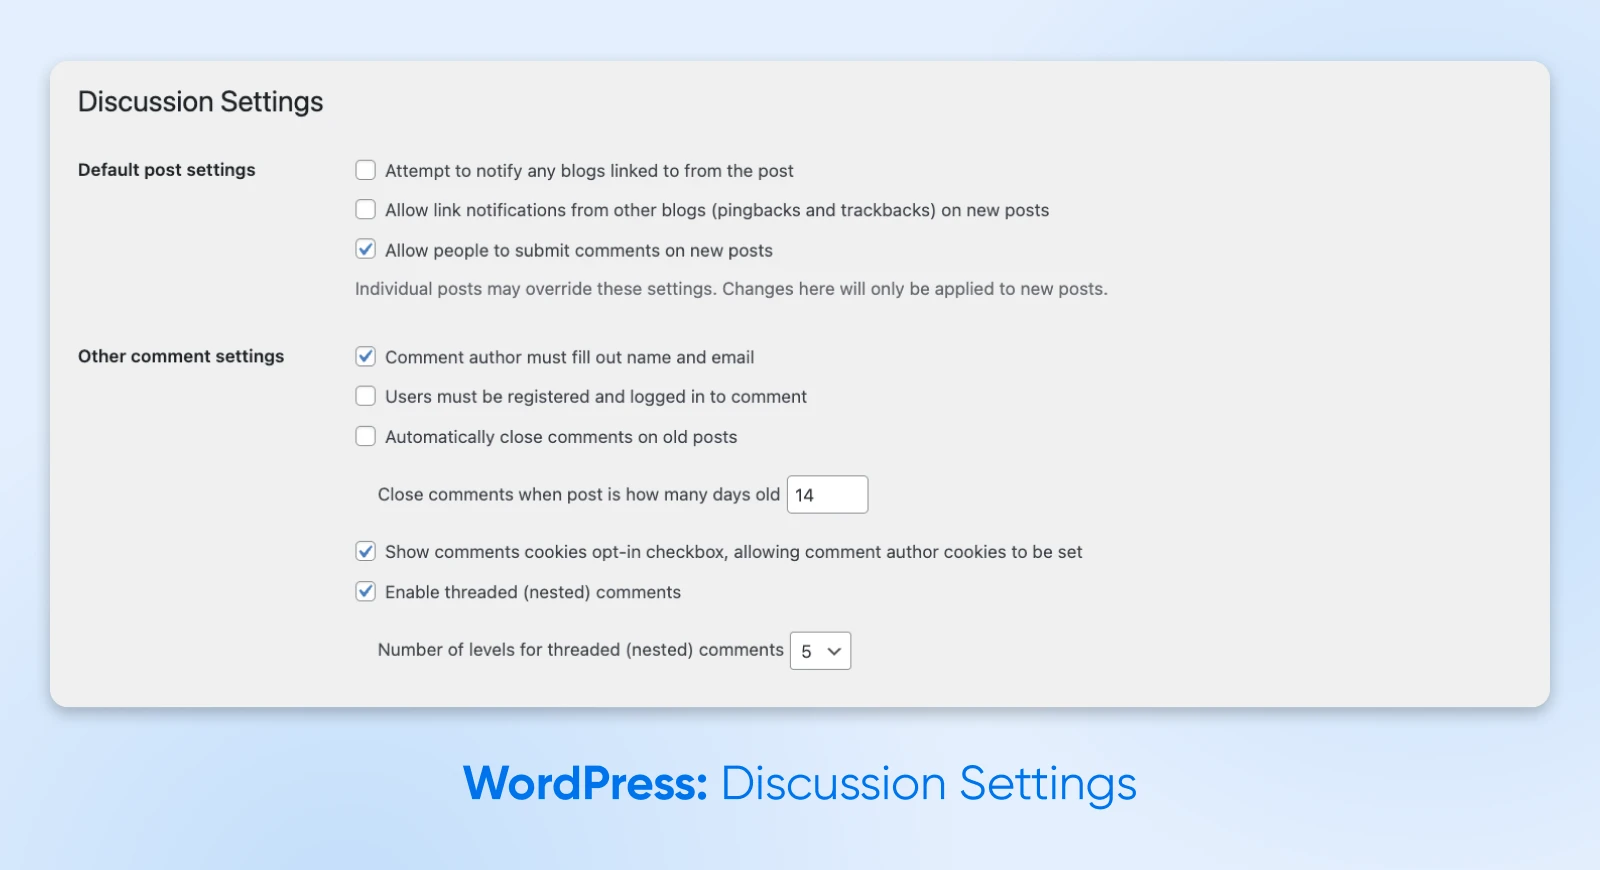
WordPress has some great features for encouraging engagement — that is, people interacting with your content. This next chapter of our “Settings” adventure is all about managing these interactions.
Default Article Settings
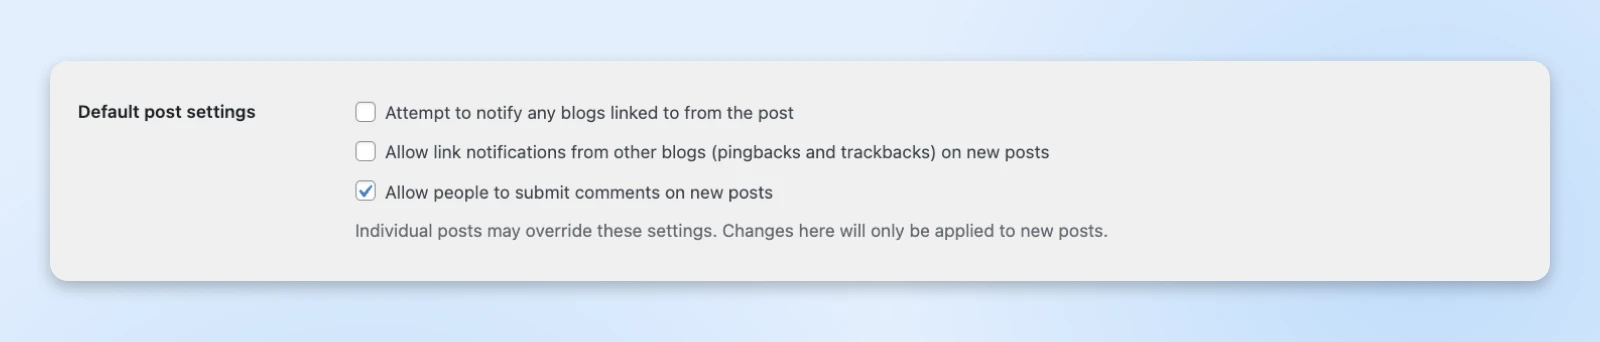
This collection of unrelated checkboxes sets up the default engagement settings for new posts.
- “Attempt to notify any blogs linked to from the post”: When you link to outside sites, they’ll get a heads-up. Sounds good, but it’s surprisingly controversial. Leave disabled unless you’re totally sure.
- “Allow link notifications from other blogs (pingbacks and trackbacks) on new posts”: Same thing in reverse. Again, best to leave this one off to avoid spam.
- “Allow people to submit comments on new posts”: Do you want to allow people to reply to your posts? That’s what this checkbox enables.
Just remember, these are only default settings. You can override them on any individual post.
Other Comment Settings
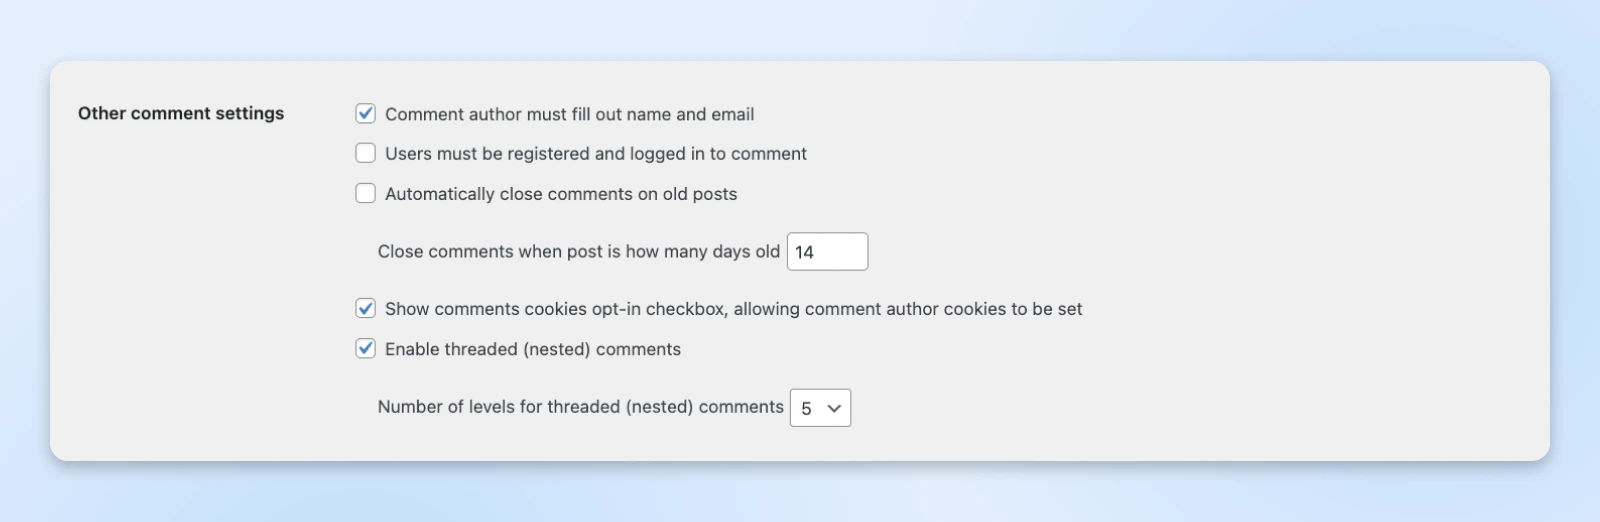
This section lets you get into the weeds regarding comments on posts. There are no obvious choices here — It’s really about your preferences.
- “Comment author must fill out name and email”: Check this if you want to discourage anonymous comments.
- “Users must be registered and logged in to comment”: Another way to discourage anonymous spam.
- “Automatically close comments on old posts”: By setting a time window for commenting, you won’t have to police conversations on ancient posts.
- “Close comments when post is how many days old”: Set your time limit here. If you enable this option, somewhere between 14 and 60 days is a good starting point.
- “Show comments cookies opt-in checkbox, allowing comment author cookies to be set”: Check this box to allow visitors to remain logged in. Doesn’t matter hugely, mainly about convenience. Just be aware that visitors will then be asked about their privacy preferences.
- “Enable threaded (nested) comments”: Check this box to allow users to reply to specific comments, like you might see on social media sites. This can make a busy comments section a little easier to navigate.
- “Number of levels for threaded (nested) comments”: How many replies to replies do you want to allow? Try one or two, and expand if conversations get deeper.
Phew, that was a lot of detail. Brace yourself for more…
Comment Pagination
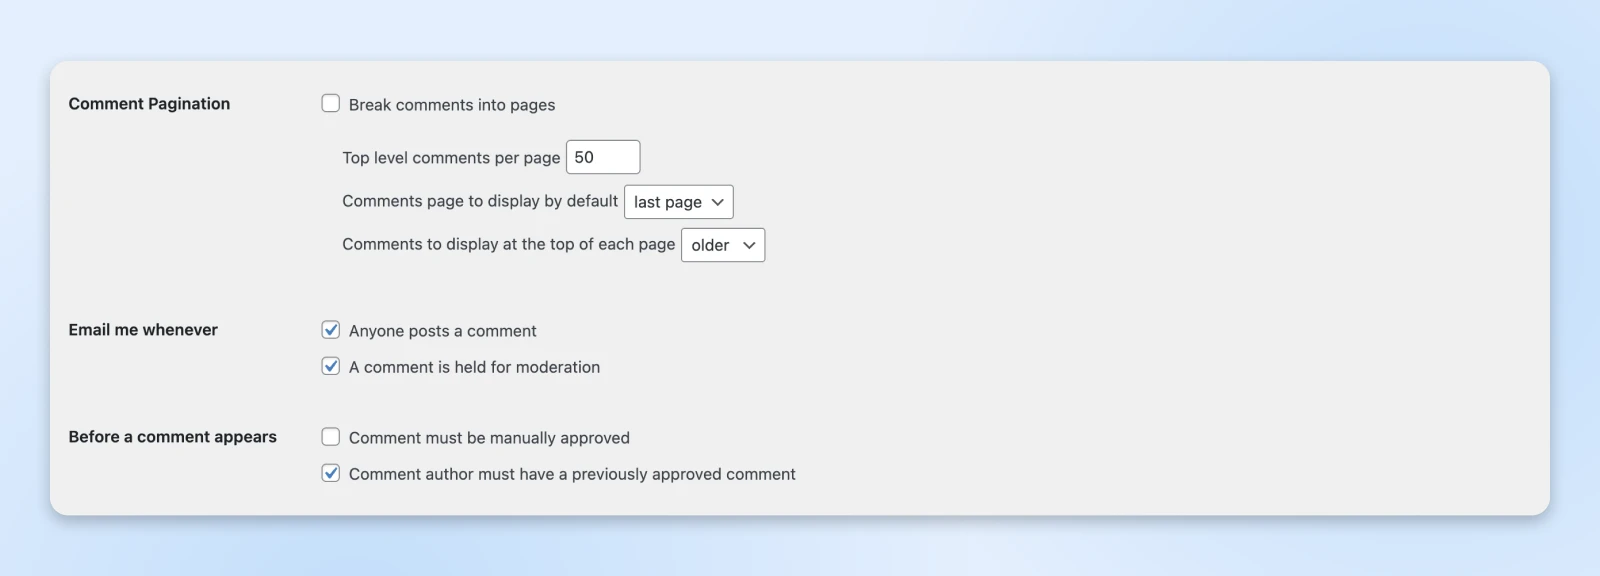
If you have a lot of people commenting on your content, you might consider checking the Break comments into pages box. This allows visitors to navigate through comments with older/newer navigation, rather than scrolling to infinity.
If you decide to enable pagination, you can use the boxes below to set how many and in which order comments will appear. We reckon that putting the newest comments at the top makes sense.
“Email me whenever”
If you want a notification when someone makes a comment, or if a comment is in your moderation queue, make that selection here.
“Before a comment appears”
These options allow you to control which comments go live on your site. That can be useful if you’re seeing plenty of spam.
Comment Moderation
Most spammers tend to sneak a link into their comments to promote their site or earn a (probably useless) backlink for SEO purposes.
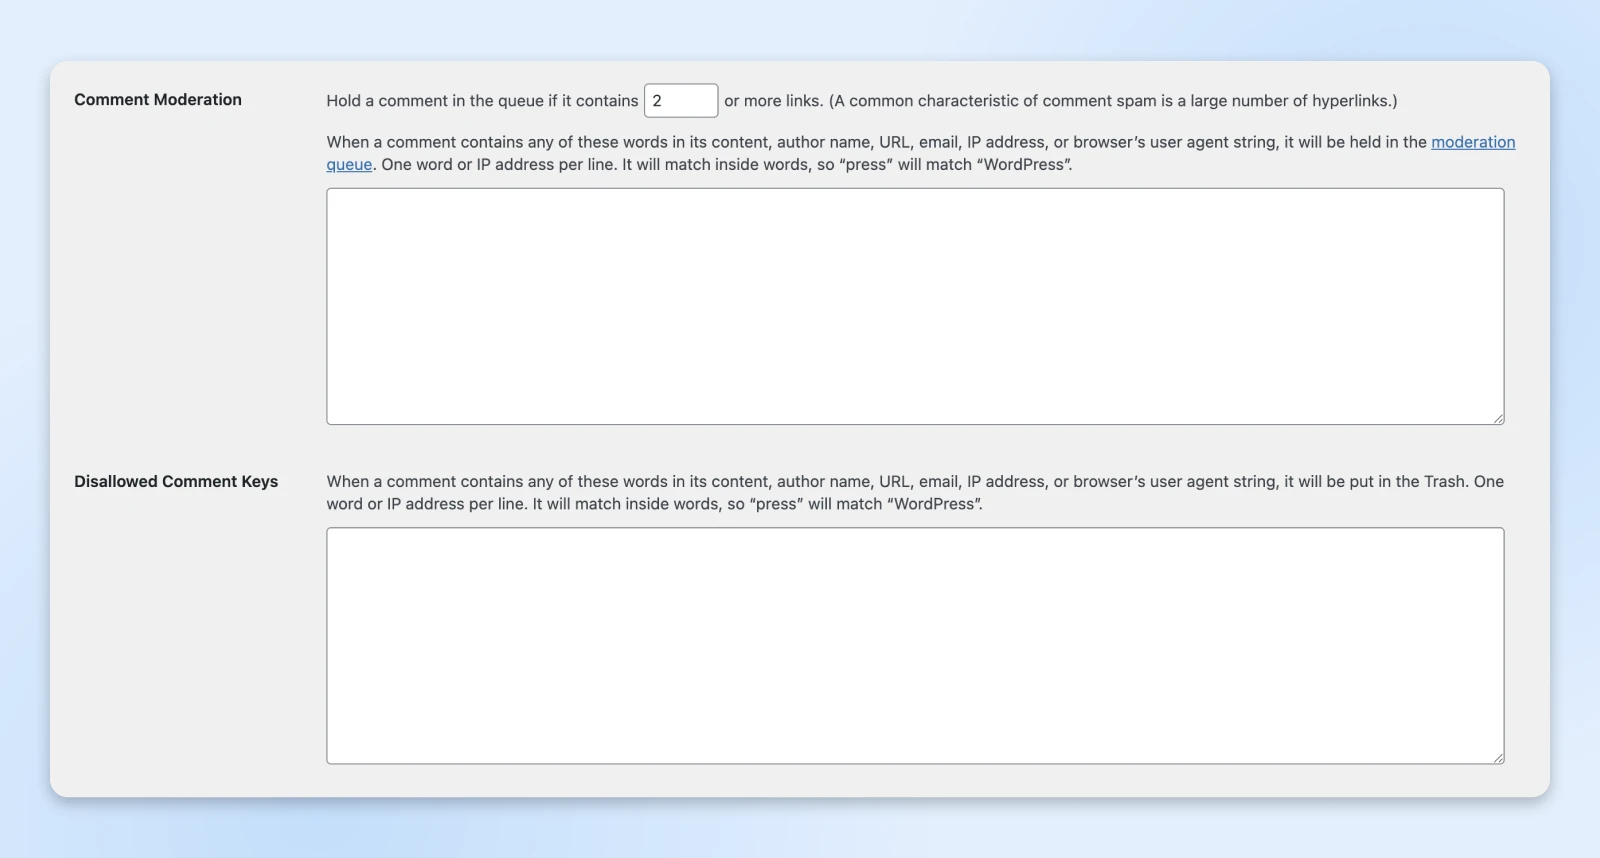
WordPress can detect links automatically and pause publishing new comments that contain links. You can control this feature by adding a number in the “Hold a comment in the queue if it contains…or more links” box.
There are a lot of options in this section, huh? Don’t worry, not far to go.
Disallowed Comment Keys
The big “Disallowed Comment Keys” box lets you block comments that contain certain terms or IP addresses you define here. That could mean curse words, usernames, or even movie spoilers!
Avatars
Finally, we have the “Avatars” section. Here, decide whether to allow little pictures next to each user, and whether those images need to be suitable for all ages.
You can also choose a default avatar for users who don’t set their own. No recommendations here, just go with your favorite.
5. Media Settings: Optimizing Images and Uploads
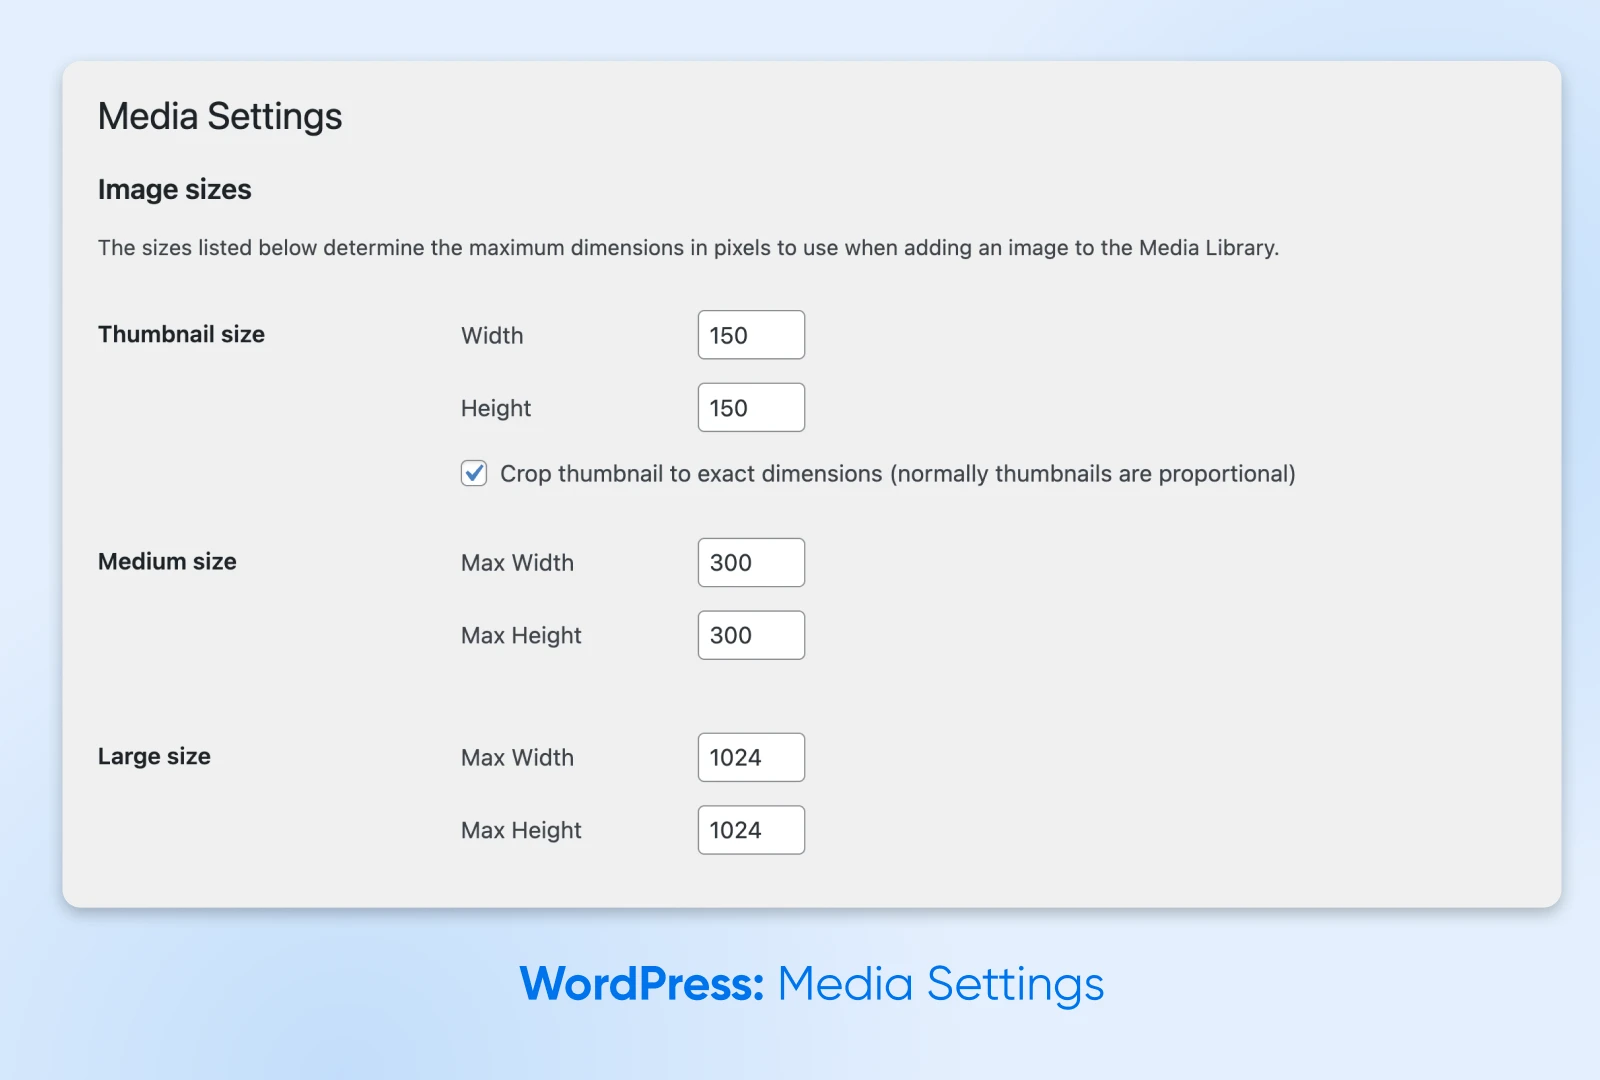
Here, you only have to decide how to handle images on your site.
“Image sizes”
First up, you have the option to control the sizing of your images after they have been uploaded to WordPress.
The default sizes are “Thumbnail” (up to 150px), “Medium” (up to 300px), and “Large” (up to 1024px). Use the boxes in this section to change the dimensions of these presets.
Bear in mind, you can change the size of any individual image later via the block editor. And if you want to create custom presets, you can use code or a plugin.
“Uploading Files”
Just one checkbox this time. Enable Organize my uploads into month- and year-based folders if you’d like to keep your uploads neatly organized!
6. Permalinks Settings: Creating SEO-friendly URLs
The next “Settings” area is one of the most powerful and potentially dangerous.
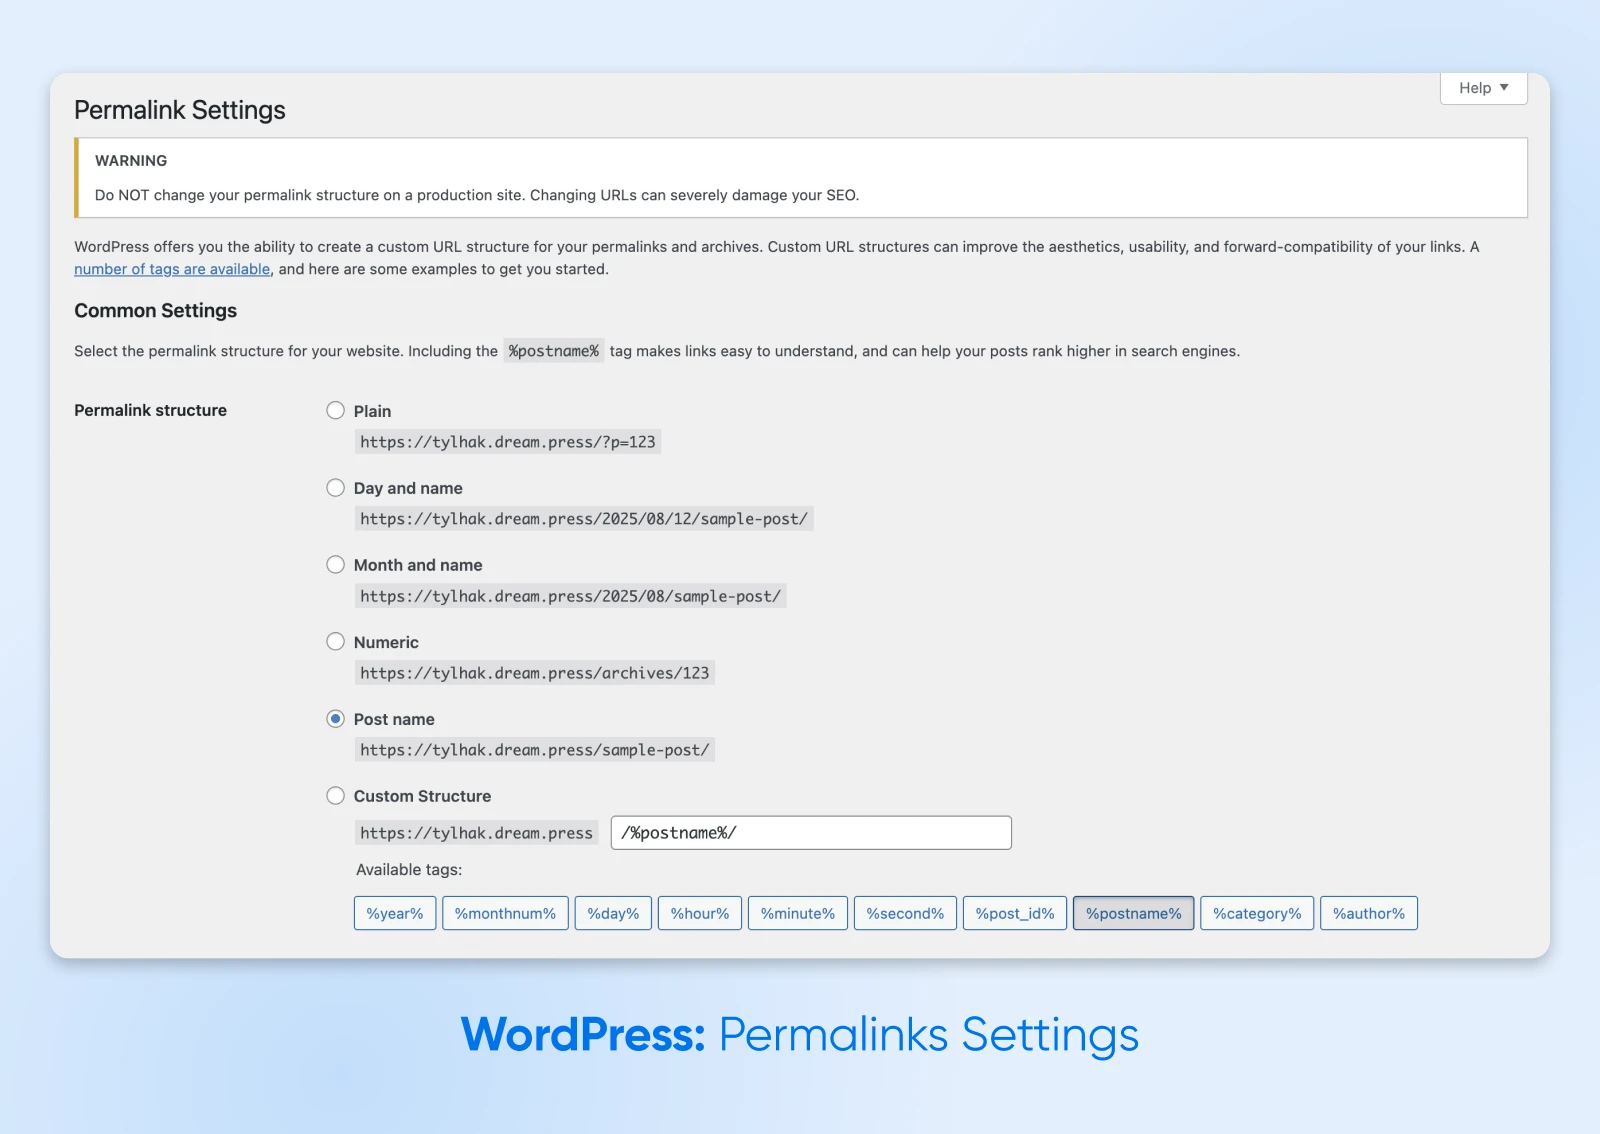
Permalinks are the format of your individual page URLs. That might not seem like a big deal, but your choice of format can make or break your site’s SEO.
The default option when installing WordPress is “Plain.” This appends a string of numbers to your URL, derived from the database ID of the post.
We think the “Plain” format is quite ugly. More importantly, it’s not good for SEO.
As an alternative, set multiple permutations of the date and post name, switch to a slightly prettier numeric permalink, or simply use “Post name.”
Our advice here is to stick to the Post name format for all but incredibly content-heavy and time-specific websites.
For instance, a new site might benefit from a date-based format. Even so, you’ll want to optimize the permalink further on a post-by-post basis.
7. Privacy Settings: Respecting Your Users
The final leg of our Settings journey is the “Privacy” area.
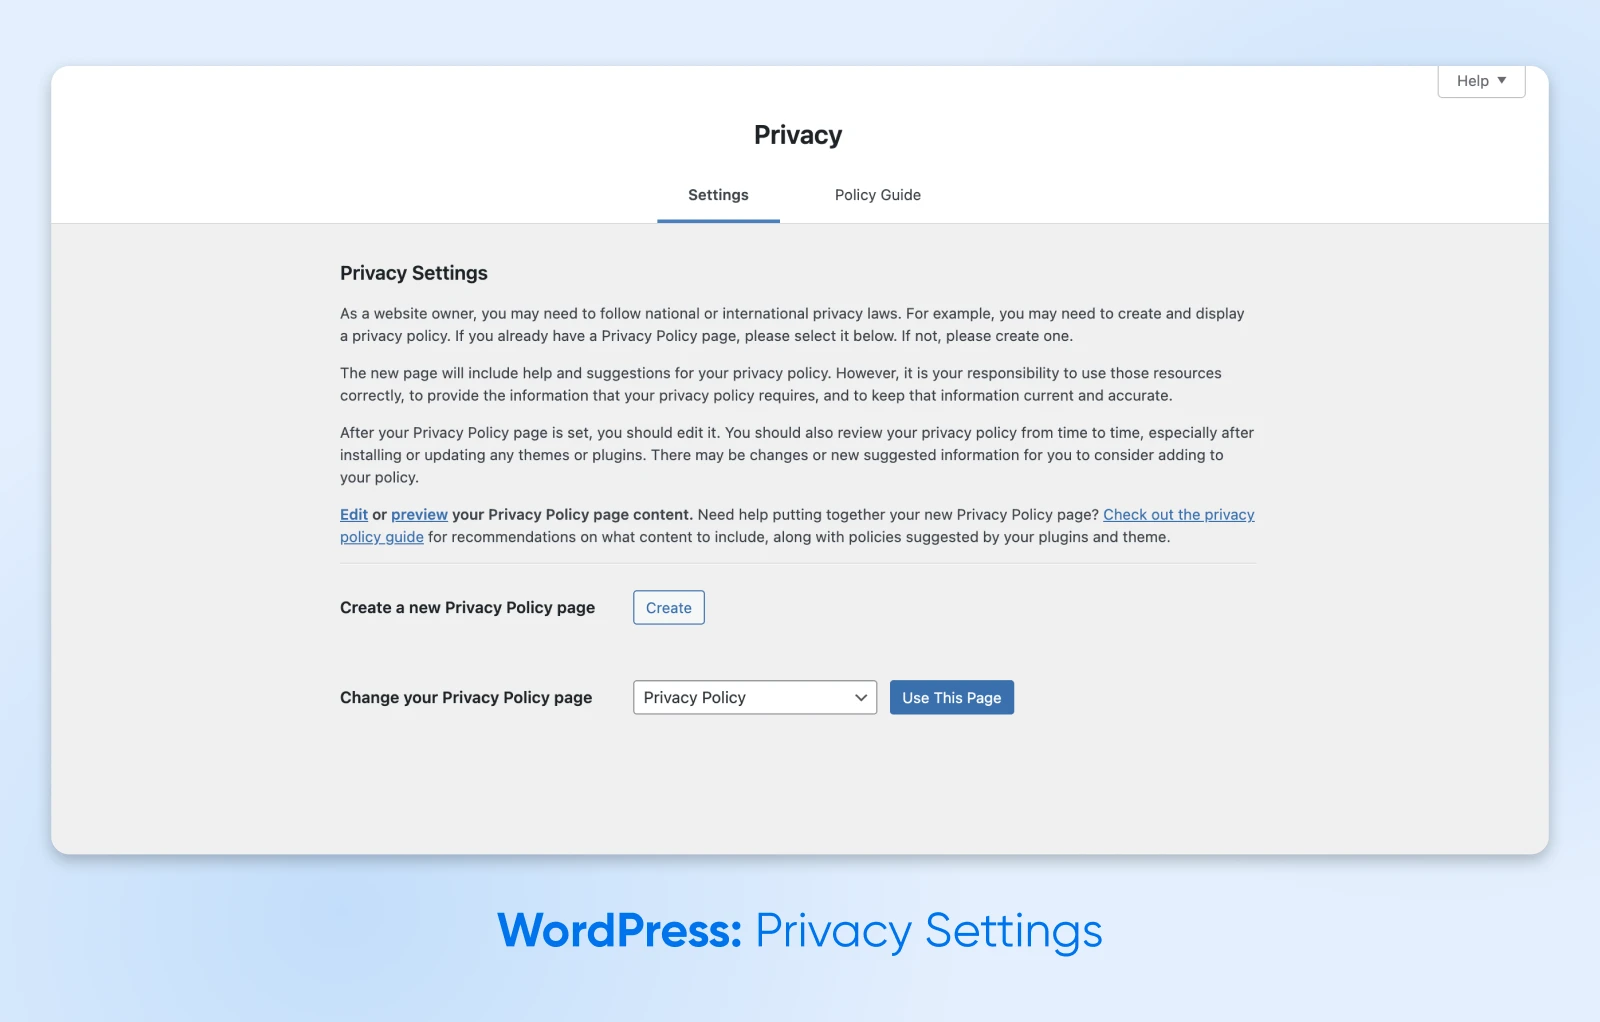
This screen allows you to set up a privacy policy for people using your site. You have two options: create a new page that will house your policy, or select an existing page.
Not sure where to start? You can also switch to the “Policy Guide” tab at the top of the page for a crash course in policy writing!
How To Fix Your Site if Your Settings Go Rogue
Most of the settings we’ve mentioned above are pretty harmless. You’re not going to lay waste to your website if you hit the wrong checkbox.
But just occasionally, changing your settings might create some problems. If your site ever breaks after you’ve made some adjustments, follow these emergency steps:
- Always start by backing up your site.
- If you’re locked out after changing your permalinks:
- Edit your wp-config.php via FTP
- Add this code, replacing example.com with your own domain: define(‘WP_HOME’,’http://example.com’);
- Add this, replacing example.com again: define(‘WP_SITEURL’,’http://example.com’);
- If you have access but you’re seeing problems with your site, deactivate all active plugins and re-test. If the problem resolves, reactivate your plugins one by one until you find the culprit.
- Plugins not the cause? Maybe it’s your theme. Switch to a vanilla theme like Twenty Twenty-Five to test.
Confidently Configure Your WordPress Settings
There, that wasn’t so scary. WordPress has a lot of settings, but they’re pretty easy to understand with the right guide. 😉
Whether you’re setting up a brand new site or trying to optimize your existing setup, visit
“Settings” in your admin area. You might be pleasantly surprised!

WordPress Hosting
WordPress + DreamHost
Our automatic updates and strong security defenses take server management off your hands so you can focus on creating a great website.
Check Out Plans
Did you enjoy this article?

