How I Save Time Scheduling LinkedIn Posts in WordPress
If you’ve ever tried sharing your blog posts on LinkedIn manually, then you know how time-consuming it can be. Switching between platforms, pasting content, and trying to keep a regular schedule takes more effort than it should.
I’ve been looking for ways to share more consistently on LinkedIn, and that’s when I realized WordPress could help. With the right setup, I don’t have to worry about missing posts or spending hours trying to stay on track.
In this guide, I’ll walk you through the two methods I’ve used. One gives you more control if you like to plan everything out, and the other runs quietly in the background so you can stay consistent without extra effort.
Why Schedule LinkedIn Posts in WordPress?
Scheduling LinkedIn posts in WordPress helps you stay consistent and reach your audience at the right time. You can plan, publish, and promote posts directly from your WordPress dashboard without needing to switch platforms.
This saves you from the hassle of logging in to LinkedIn separately or copying and pasting your content.
It also makes it easier to hit those “golden hours” when there’s the most activity on LinkedIn—even if you’re busy working on your site.
Here are some key benefits of scheduling LinkedIn posts in WordPress:
- Stay consistent – Keep your publishing flow steady without juggling multiple apps.
- Post at the best times – Share updates when your audience is most active, even if you’re offline.
- Plan strategically – Align your LinkedIn posts with your WordPress content calendar so everything works toward your business goals.
- Reduce stress – Batch-create LinkedIn updates while writing your blog posts, instead of scrambling to post something at the last minute.
Plus, this approach works for a wide range of WordPress websites.
Here’s a quick overview of how you might be able to benefit, based on the type of website you run:
The best part is that you can do all this right inside WordPress. You can either choose an all-in-one solution and manage multiple platforms from a single dashboard or automate posts directly from your site.
Not sure which one’s right for you? Don’t worry – I’ll walk you through both so you can see which approach matches your workflow.
Which Method Should You Choose?
The right tool for scheduling LinkedIn posts in WordPress depends on how you like to work:
- Method 1: ClickSocial. If you want an all-in-one solution, ClickSocial lets you schedule posts across multiple social platforms, including LinkedIn. You can also use Quick Share to automatically publish a LinkedIn post whenever you publish a new blog post.
- Method 2: Uncanny Automator. If you prefer a more hands-off approach, Uncanny Automator might be a better fit. Once you set up an automation recipe, it will automatically share your WordPress posts to LinkedIn the moment they’re published.
Now, I’ll share two methods for scheduling LinkedIn posts in WordPress.
Here’s a quick overview of all the things I’ll cover in this guide:
Method 1: Schedule LinkedIn Posts Using ClickSocial
ClickSocial is the best WordPress social media scheduling plugin, especially for beginners and busy site owners who want everything in one place. With its visual calendar, you can easily plan, schedule, and adjust your posts as needed.
This setup works especially well for bloggers and business owners who want a clear overview of their content across different social media platforms.
On our partner brand websites, we use ClickSocial to streamline social scheduling, and it’s been a reliable time-saver. You can read our complete ClickSocial review to see all the details.
Step 1: Create Your ClickSocial Account & Get Your API Key
First, you’ll need to create your ClickSocial account before installing the plugin.
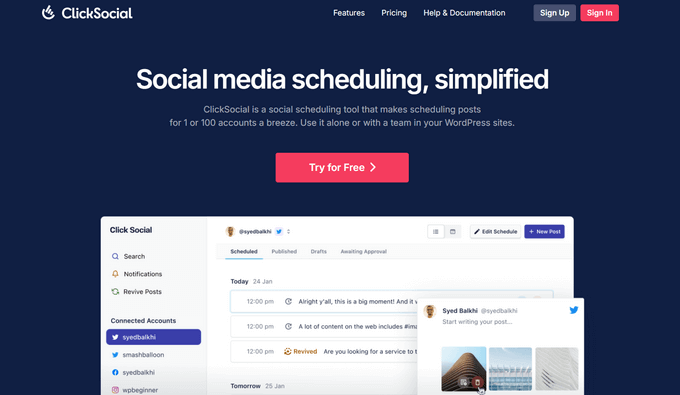
Head over to the ClickSocial website and click the ‘Sign Up’ button. Then, you can simply complete the registration process and make note of your login credentials.
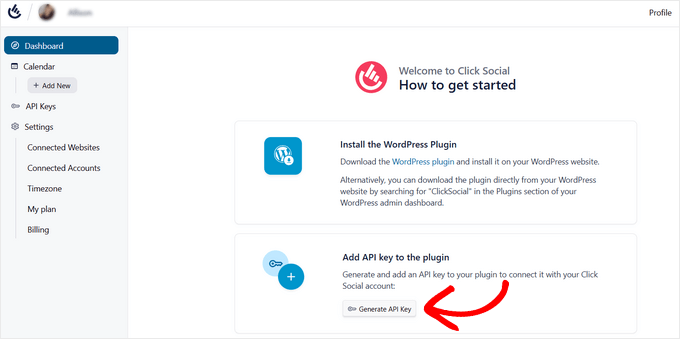
After you’ve signed up, you’ll want to get your API key so you can connect it to your WordPress site.
In your ClickSocial dashboard, look for the ‘Generate API Key’ button and click it.
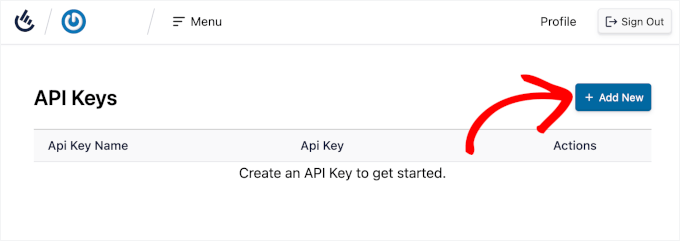
This will take you to the API Keys page.
Go ahead and click on the ‘Add New’ button.
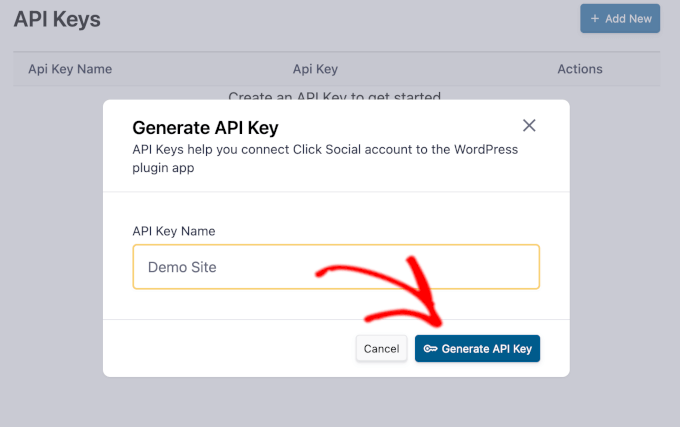
In the popup that appears, you’ll need to enter a name for your API key. I recommend using something clear, like your website or project name, so you can easily remember what it’s for later.
With that done, you can click the ‘Generate API Key’ button.
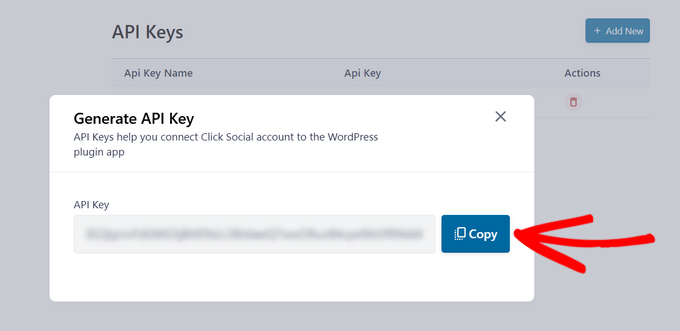
On the next screen, you’ll see your unique API key.
Be sure to copy this API key and store it in a safe place, like a password manager. For your security, ClickSocial will only show the full key this one time.
Step 2: Install and Connect ClickSocial With Your WordPress Website
Now, you’re ready to install and activate the ClickSocial WordPress plugin.
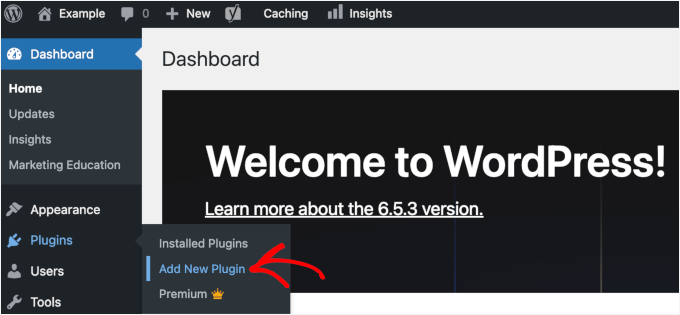
You can navigate to your WordPress dashboard and go to Plugins » Add New Plugin.
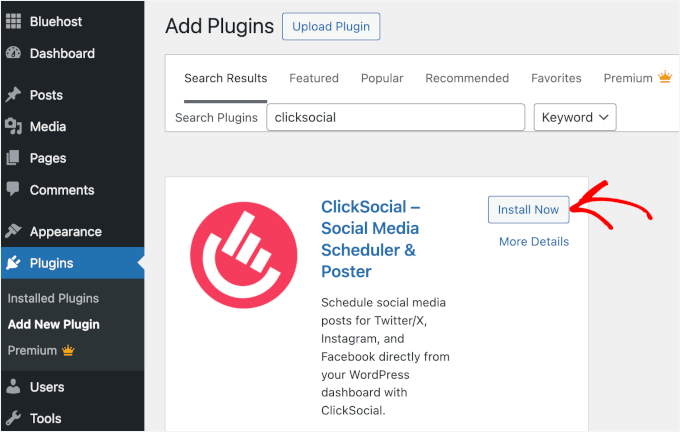
In the search bar at the top, type “ClickSocial” and press Enter.
When you see the plugin appear in the results, click ‘Install Now.’
Once the installation is finished, hit ‘Activate.’ For more detailed instructions, see our guide on how to install a WordPress plugin.
Next, the ClickSocial setup wizard will ask you to link your WordPress site using your unique API key.
If you accidentally navigate away, simply go to ‘Onboarding’ under the ‘ClickSocial’ tab. Enter your API key and click the ‘Connect’ button.
Step 3: Connect Your LinkedIn Account to ClickSocial
Now that your website is connected to ClickSocial, you can connect your LinkedIn account.
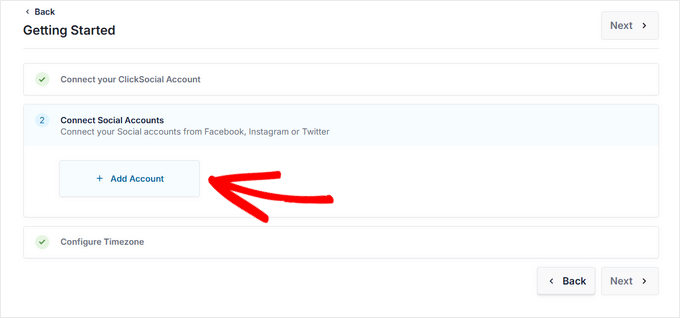
From your WordPress dashboard, go to ‘ClickSocial’ to continue with the setup wizard. Under step 2, click the ‘Add Account’ button to get started.
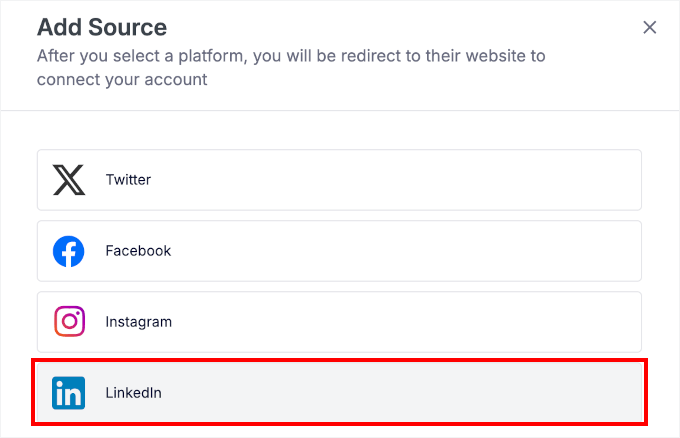
A popup will display the social media platforms you can connect, such as LinkedIn, Instagram, Facebook, and X (formerly Twitter).
For this tutorial, let’s select the LinkedIn option.
This will open a new window where you can log in to LinkedIn and give ClickSocial permission to post for you.
Click ‘Allow’ to grant these permissions. Remember, this is completely safe, and you can revoke access at any time within your LinkedIn settings.

After authorizing the connection, you’ll need to choose your timezone settings.
You can either use ClickSocial’s connected account timezone or stick with your WordPress site’s timezone setting.
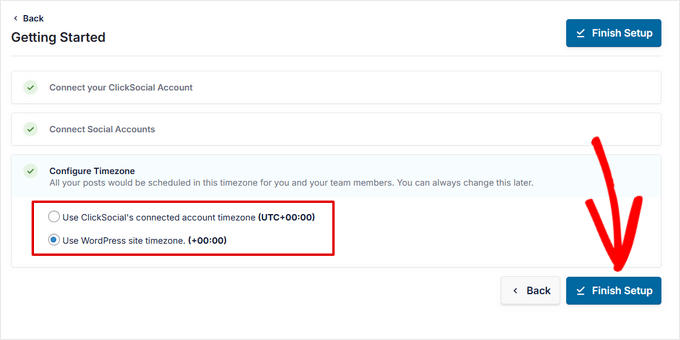
Click ‘Finish Setup’ to complete the onboarding process and the LinkedIn integration.
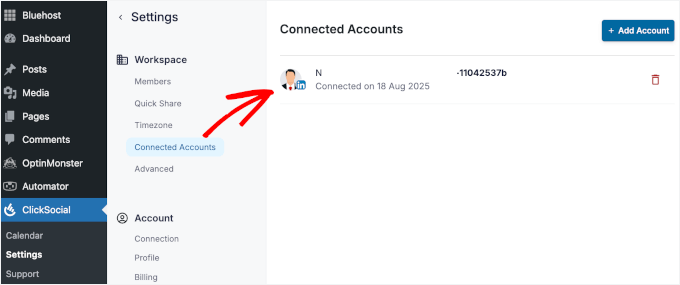
You should now see your LinkedIn account listed in ClickSocial » Settings in the ‘Connected Accounts’ tab under ‘Workspace.’
Step 4: Set Up Your LinkedIn Post Calendar
After connecting your LinkedIn account, ClickSocial will display your post calendar, so you can control your entire LinkedIn posting schedule.
The calendar view shows you exactly when your posts will go live and helps you spot any gaps in your posting schedule.
You can see scheduled posts, published posts, drafts, and even manage approval queues if you’re working with a team.
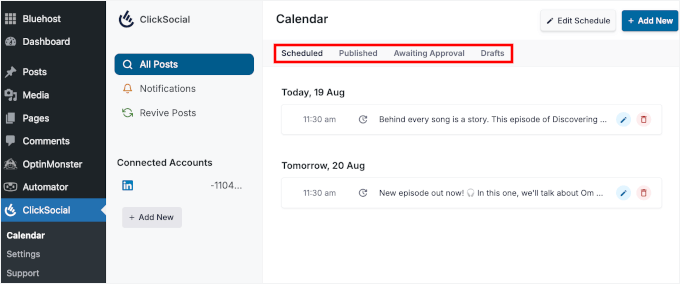
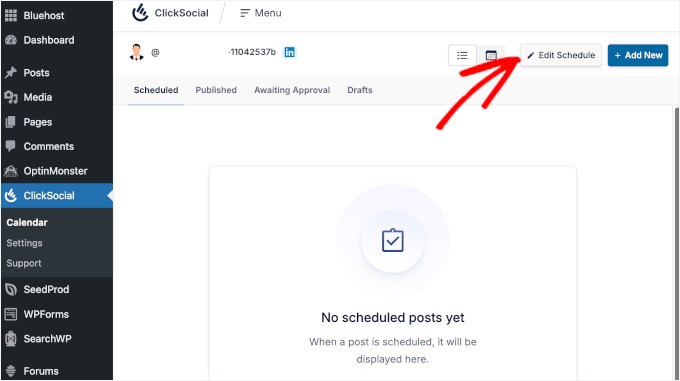
To set up your default posting times, click the ‘Edit Schedule’ button at the top of the calendar.
This way, you don’t have to pick a time every time you write a new blog post.
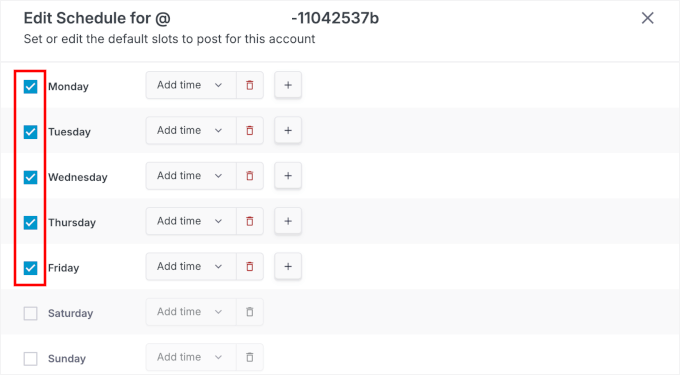
From here, select the checkboxes on the left side to select which days of the week you want to post on LinkedIn.
I typically choose Monday through Friday since that’s when my audience is most active.
Once you’ve selected your posting days, use the dropdown menus on the right to set specific time slots for each day.
You can add multiple time slots per day using the plus (+) icon or remove unwanted slots with the red trash icon.
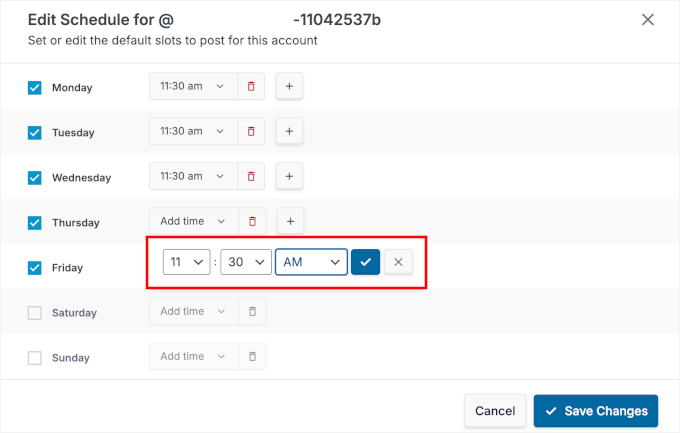
That said, I recommend starting with one post per day during business hours – around 9 AM or 1 PM works well for most industries.
You can always adjust these times later based on your audience’s engagement patterns.
When you’re happy with everything, go ahead and click ‘Save Changes’ to apply your new posting schedule.
🧑💻 Pro Tip: Even with a set schedule, you can still choose custom times for individual posts. I’ll show you how in the next step.
Step 5: Schedule Your LinkedIn Posts in WordPress
Now, you can start creating and scheduling your LinkedIn content. ClickSocial’s post composer makes this simple, even if you’re new to social media scheduling.
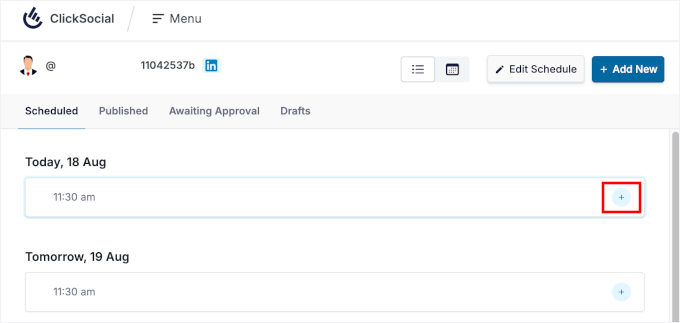
To add a new post, you can click the plus (+) icon next to an available time slot on your calendar.
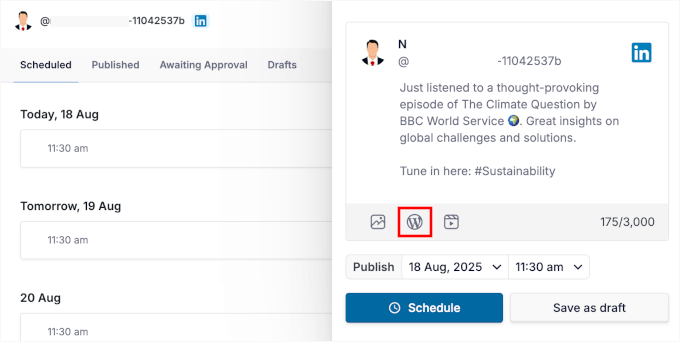
In the ClickSocial post composer, simply type your LinkedIn post content directly into the text field.
Below the text area, you’ll see several icons for adding other elements to your post:
- Image – upload photos from your media library.
- Link – add a link to existing WordPress blog posts.
- Video – embed videos that support your message.
For this tutorial, I’ll add a link to an existing WordPress blog post, so I will click on the ‘WordPress’ icon.
In the popup that appears, you’ll choose a WordPress post to auto-schedule.
Simply click on the post you want to add.
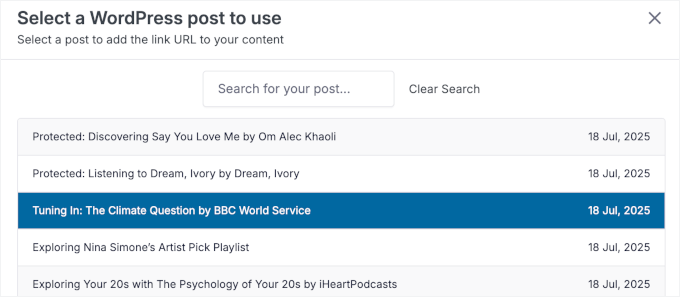
You can choose more than one link if you need to. But I recommend selecting only one post to keep your content focused.
After that, scroll down the popup and click the ‘Add to Schedule’ button.

You should now see the link attached in the post composer.
From here, you can switch to the ‘Preview’ tab to see exactly how your content will appear on LinkedIn.
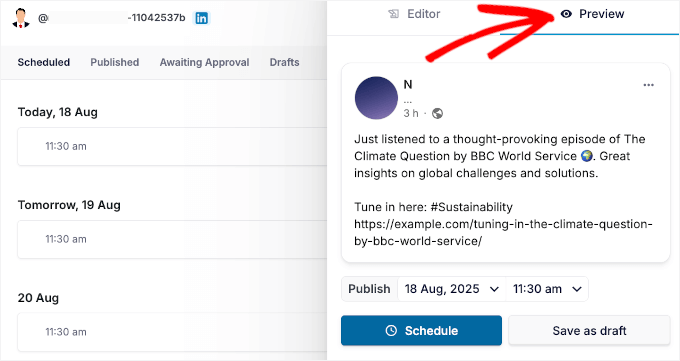
If anything needs changing, you can go back to the composer to fine-tune the text or add hashtags.
When you’re happy with your draft, click the ‘Schedule’ button at the bottom.
If you’d rather post at a custom time, just use the dropdowns next to ‘Publish’ to pick the date and time you want.
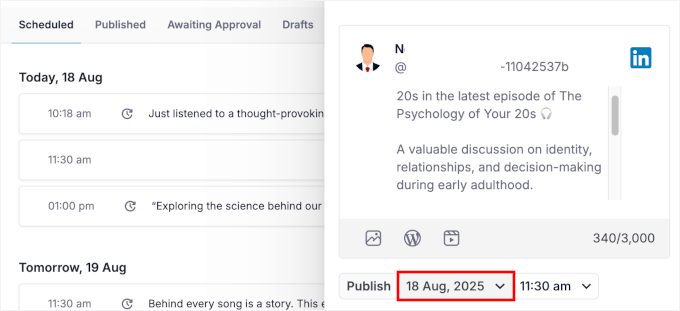
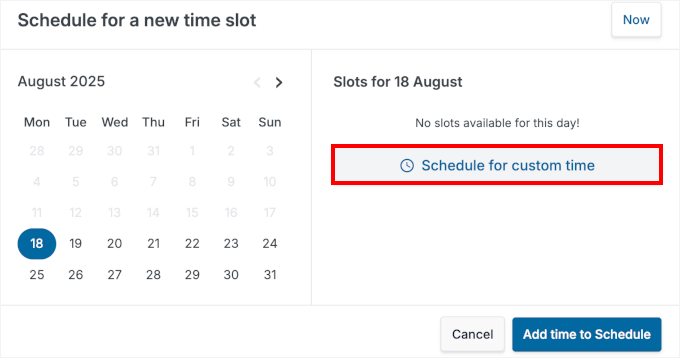
In the popup that appears, go ahead and select your desired publishing date from the calendar.
Then, click ‘Schedule for custom time.’
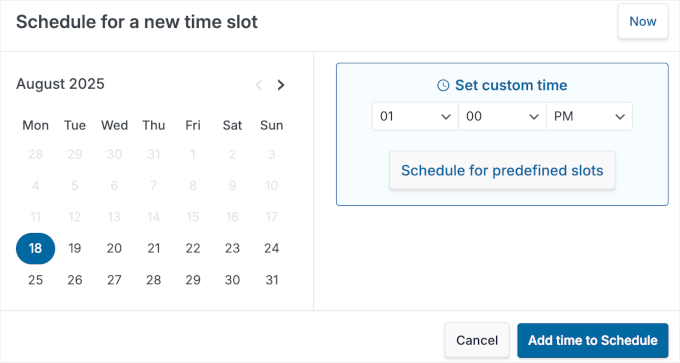
From the dropdown, you can specify the exact hour and minute.
After that, click the ‘Add time to Schedule’ button to confirm.
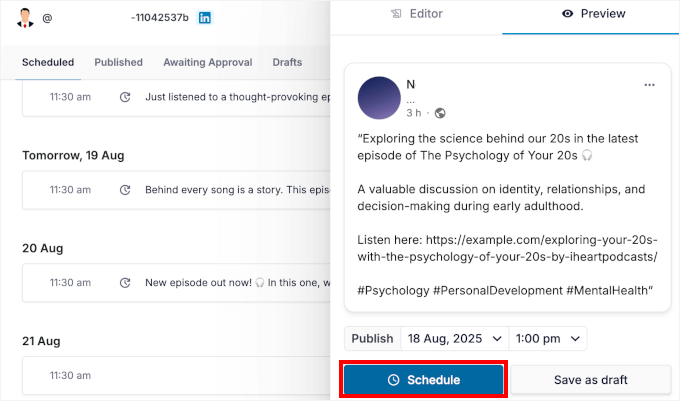
This will bring you back to the post composer, where you can give your scheduled post another look. You can also switch to the ‘Preview’ tab to double-check everything.
And when you’re ready, you can hit the ‘Schedule’ button.
And that’s it! You can repeat this process for any blog posts you’d like to schedule and share on LinkedIn.
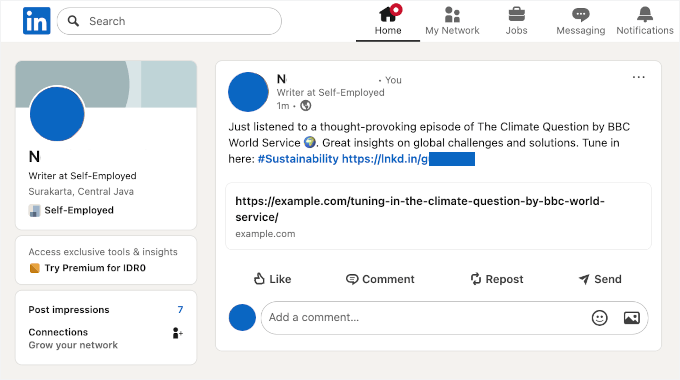
When you’re finished, you’ll see all your upcoming posts in the ‘Scheduled’ tab. Here, I have a blog post set for the default slot and another scheduled at a custom time.

ClickSocial will automatically post your LinkedIn content at the time you’ve set.
Here’s my demo scheduled LinkedIn post as an example:
Step 6: (Optional) Quick-Share Your WordPress Post to LinkedIn
Want your new WordPress posts to go straight to LinkedIn? With ClickSocial, you can do that by setting up Quick Share.
Instead of creating each LinkedIn post from scratch, Quick Share generates one for you as soon as you publish a blog post.
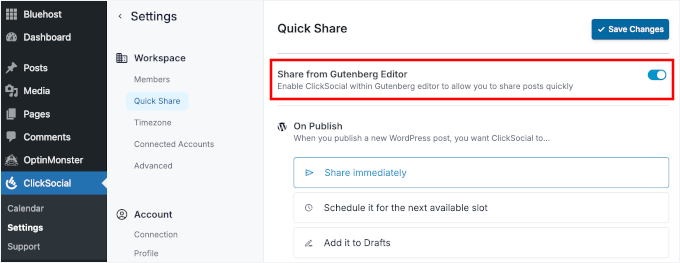
To set it up, navigate to ClickSocial » Settings » Quick Share from your WordPress dashboard.
Once inside, you can go ahead and toggle on ‘Share from Gutenberg Editor.’
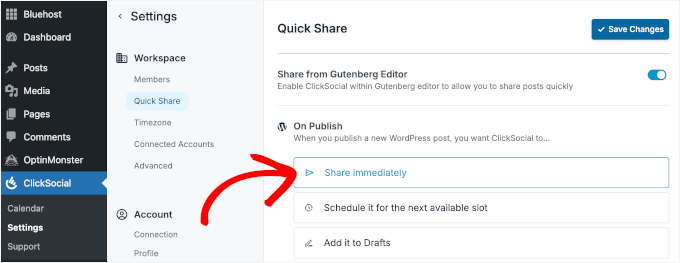
Next, you can choose what should happen when a blog post is published:
- Share immediately – publish to LinkedIn the moment your blog goes live.
- Schedule for the next available slot – fit the post into your existing posting calendar (you set this up in step 5).
- Add to Drafts – save it for review so you can edit before posting.
For this tutorial, I’ll select ‘Share immediately’ so my LinkedIn post goes live at the same time as my blog post.
You can then scroll down to the ‘Account’ section.
Here, click on your LinkedIn account’s box, then once again on the ‘Edit’ button to open the post composer.
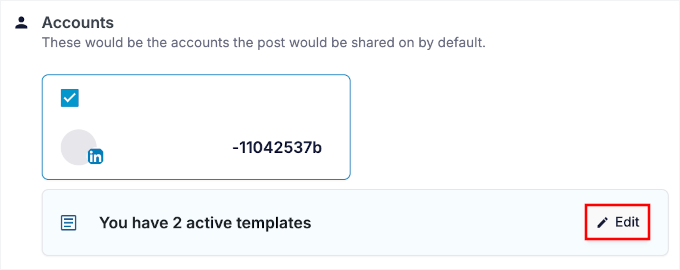
In the popup, you can build a template with dynamic variables like post title, link, excerpt, and more.
This ensures your LinkedIn post auto-generates based on your blog content.
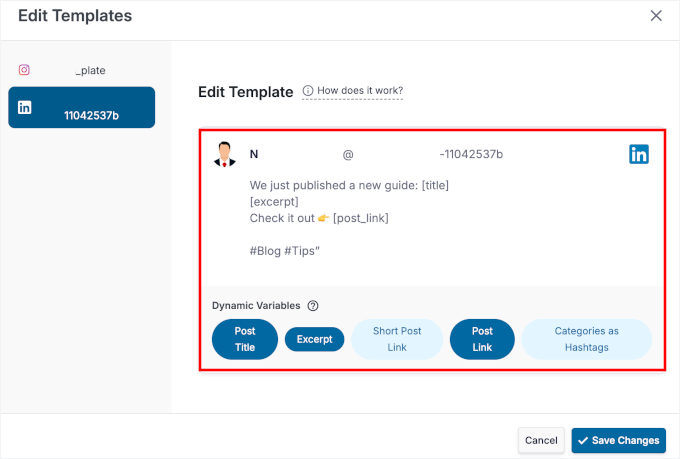
When everything looks good, don’t forget to save your settings.
Now, whenever you publish a post, you’ll see the ClickSocial Share button in your WordPress content editor.

Clicking it will open a preview of your LinkedIn post.
From here, you can make final tweaks, like reviewing text, fixing formatting, or adding hashtags.
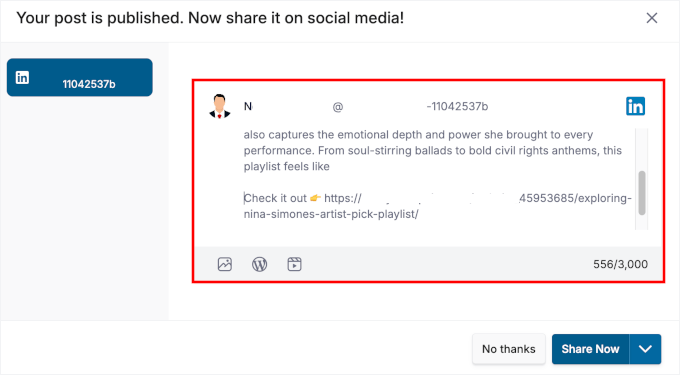
Once everything looks good, you can hit ‘Share Now’ (or choose to schedule it for later).
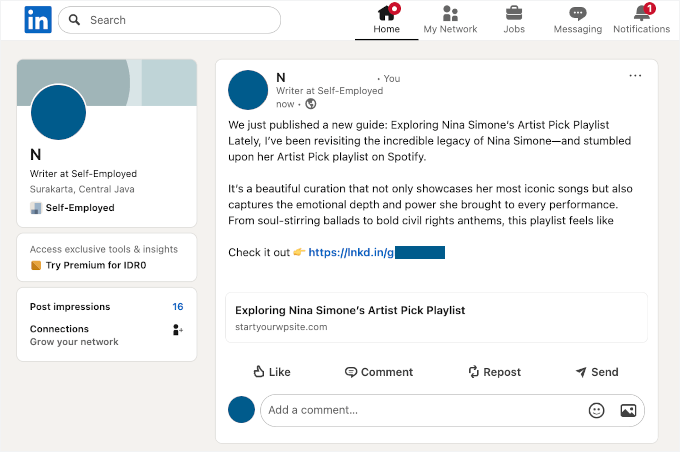
ClickSocial will then publish your post according to the settings you’ve chosen. Here’s an example of my automated LinkedIn post:
Method 2: Publish LinkedIn Posts Using Uncanny Automator
Uncanny Automator is ideal if you’d rather have your WordPress posts sent to LinkedIn automatically as soon as they’re published. It works through “recipes,” which are automated workflows that trigger an action, like posting to LinkedIn.
For more information, see our full Uncanny Automator review.
Step 1: Install and Activate Uncanny Automator
First, you need to install the Uncanny Automator plugin on your WordPress site. The plugin offers both free and pro versions, but the free version includes everything you need for basic LinkedIn automation.
📝 Note: While the free plugin is perfect for this task, Uncanny Automator Pro unlocks more advanced workflows. For example, you could add a 24-hour delay before sharing a post or only share posts from a specific category.
To install the plugin, navigate to Plugins » Add New Plugins in your WordPress dashboard.

Then, you can search for “Uncanny Automator” in the plugin directory.
Once you’ve found it, click ‘Install Now’ and wait for the installation to complete, then click ‘Activate’ to enable the plugin.
If you need help, please see our complete guide on how to install a WordPress plugin.
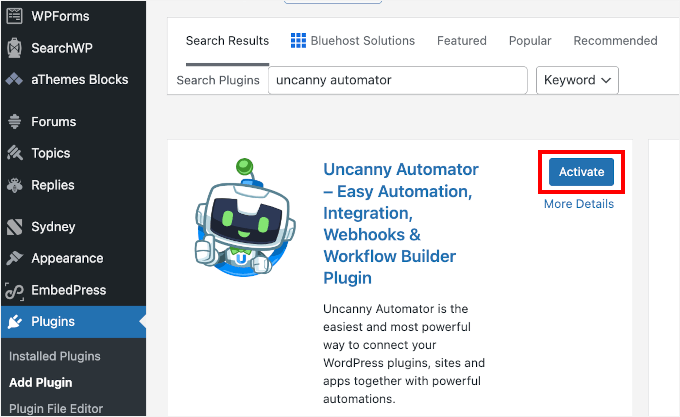
After activation, you’ll see a new Automator menu item in your WordPress dashboard. This is where you’ll create and manage all your automated workflows.
But first, let’s set up your free Uncanny Automator account, since you won’t be able to connect to LinkedIn without it.
Let’s head over to ‘Automator’ and click the ‘Connect your free account!’
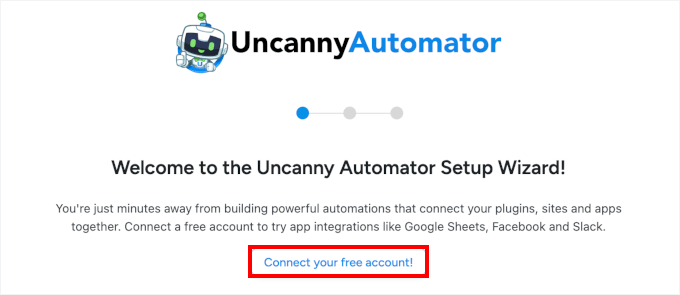
On the next screen, you’ll see a registration form. Simply fill in the required details, and you’ll be good to go.
Step 2: Create a New Recipe for LinkedIn Automation
With Uncanny Automator set up, you’re ready to create your first automation recipe.
In your WordPress dashboard, go to Automator » Add new recipe.
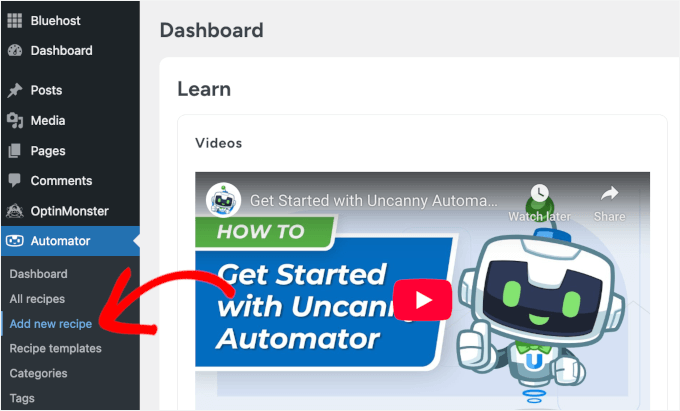
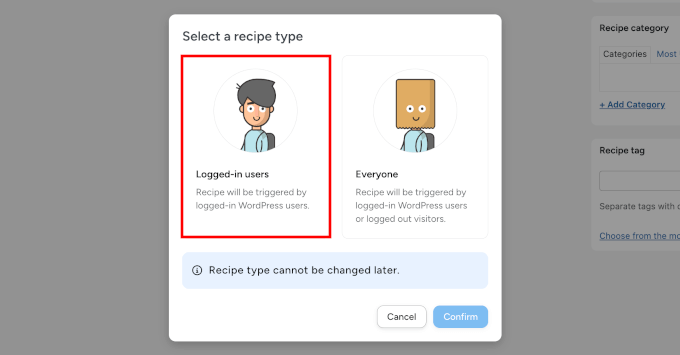
A popup will appear asking what type of recipe you’d like to create.
Here, you’ll want to select ‘Logged-in users’ from the options.
This makes sure the automation only runs when you or another trusted user publishes a post. It prevents accidental triggers from guest contributors or other user actions.
Next, you’ll need to give your recipe a descriptive name so it’s easy to recognize later.
Something like “Share New WordPress Blog Posts to LinkedIn” or “LinkedIn Automation” works well, since it reminds you exactly what the recipe does.
Plus, having a clear naming system really helps once you start creating more recipes for different platforms or content types.
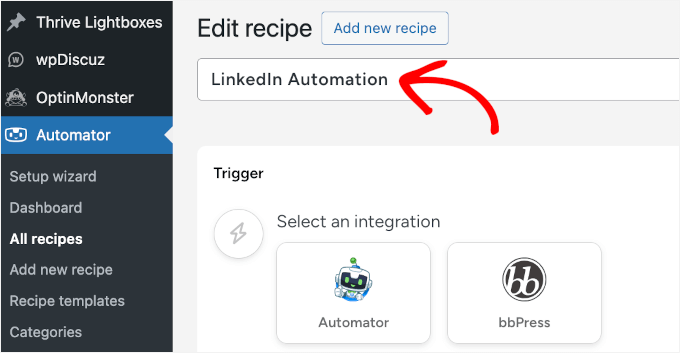
With that done, you can click ‘Save’ to proceed to the recipe configuration screen.
Step 3: Configure Your Automation Trigger
A trigger is what tells Uncanny Automator when to run your recipe. In this case, you’ll want it to fire whenever you publish a new blog post on your WordPress site.
In the Trigger section, you’ll see a list of available integrations. Go ahead and choose ‘WordPress’ since the automation is based on WordPress activity.
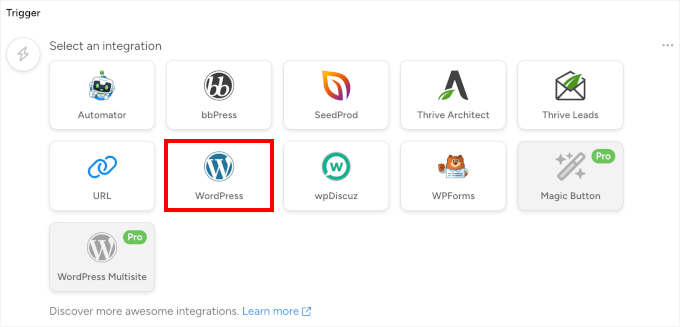
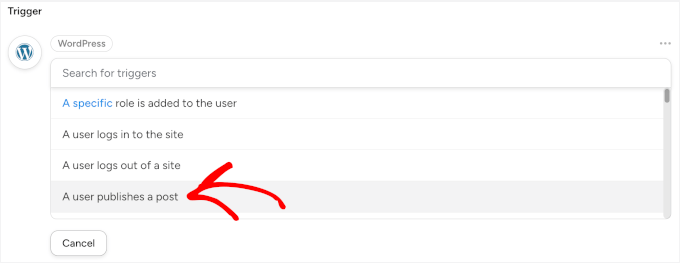
In the dropdown menu that appears, let’s select ‘A user publishes a post.’
This specific trigger ensures your recipe only runs when content goes from draft to published status.
Uncanny Automator will then prompt you to select which post type should trigger the automation.
If you only want to share regular blog posts, select ‘Post’ from the dropdown menu.

But if you also publish other content types like case studies or portfolios that you’d like to share on LinkedIn, select ‘Any post type’ instead. This gives you more flexibility as your content strategy grows.
Once you’ve configured your trigger settings, don’t forget to click ‘Save.’
Step 4: Configure Your LinkedIn Auto-Share Action
Now, you’re ready to set up LinkedIn auto-sharing. In this step, you’ll tell Uncanny Automator what should happen each time a post is published.
In the ‘Actions’ section, click ‘Add action’ to get started.
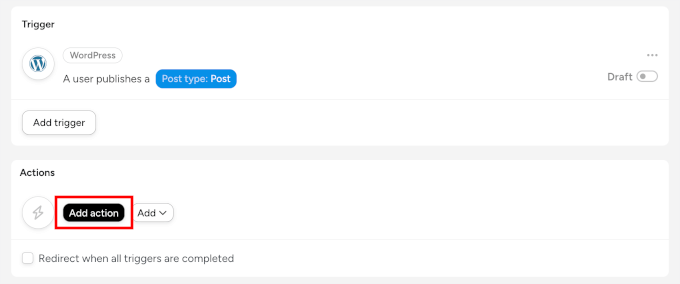
This will open the list of available integrations.
You can scroll down and select ‘LinkedIn’ from the menu.
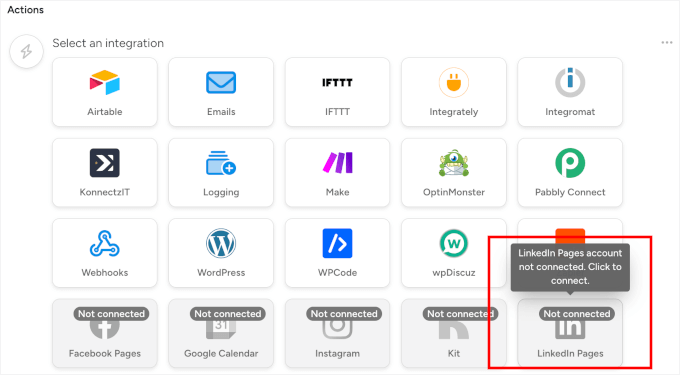
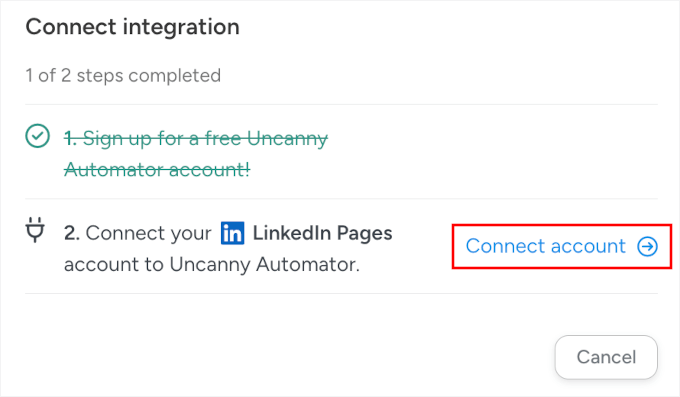
If this is your first time connecting LinkedIn to Uncanny Automator, you’ll see a ‘Connect account’ button in the popup that appears.
Go ahead and click it.
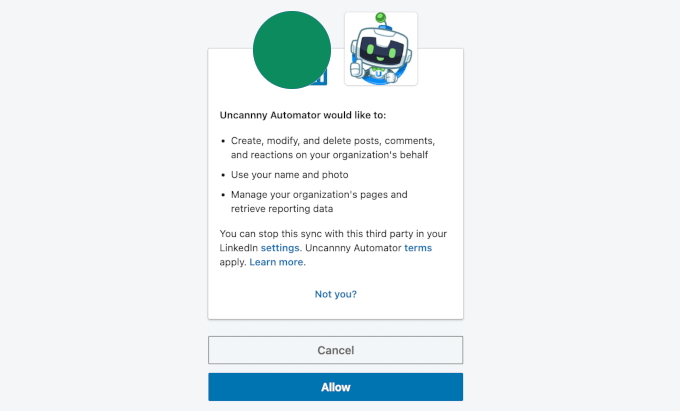
LinkedIn will then ask you to confirm that Uncanny Automator can post for you.
Click ‘Allow’ to grant the necessary permissions. This process is completely secure, and you can always manage or revoke this access from your LinkedIn account settings.
After connecting your LinkedIn account, Uncanny Automator will take you to the recipe editor.
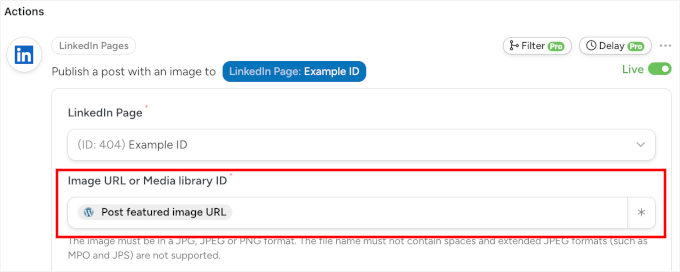
From here, let’s select ‘Publish a post with an image to a LinkedIn page’ from the action dropdown. This way, each LinkedIn post will have a featured image to help make it stand out.

You can then tell Uncanny Automator which image to use for your LinkedIn post. The best way to do this is to use the post’s featured image, so every new article will have its own unique visual.
To set this up, click the asterisk (*) button next to the ‘Image URL’ field. This will open a list of dynamic tokens. Search for ‘Post Featured Image URL’ and select it.
Now, your post’s featured image will be automatically included in your LinkedIn post.
🧑💻 Pro Tip: For the best results on LinkedIn, make sure your featured images are at least 1200 x 627 pixels. This ensures your image looks sharp and professional in the feed.
For more social media image sizes, see our complete social media cheat sheet.
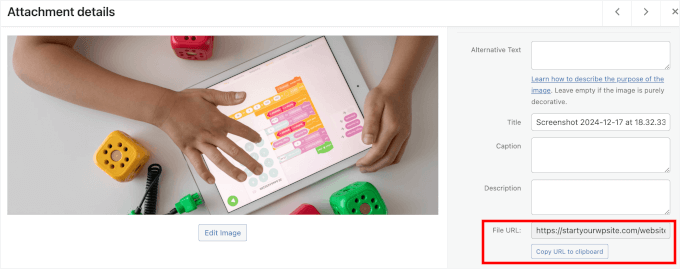
Alternatively, if you want every post to use the same default featured image, you can paste a specific image URL from your Media Library into this field instead of using a token.
No worries if you don’t know the URL because you can grab it from your Media Library.
All you have to do is open your WordPress media library in a new tab, click on the image you want to add, and copy the value from the ‘File URL’ field.
After setting the image, you can create a template for your post’s text in the ‘Content’ field. You can use a mix of your own words and dynamic tokens, which automatically pull information from your WordPress post.
To add tokens, click the asterisk (*) button and search for the one you need. For example, you might want to look for ‘Post Title’ and ‘Post URL’ and select them as your token.
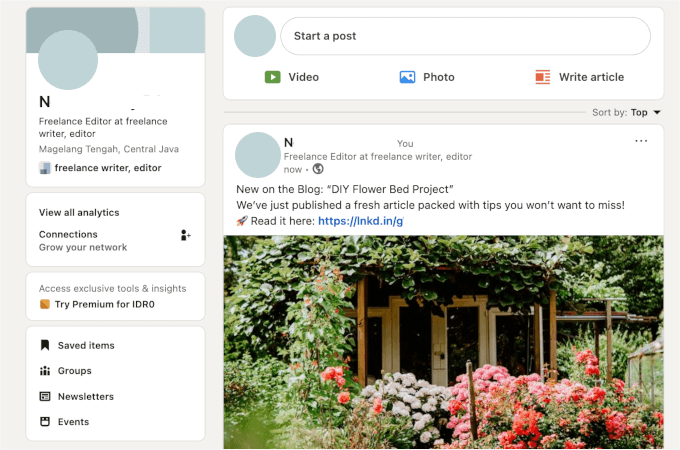
Here is a simple template you can use: “New on the Blog: {Post Title} We’ve just published a fresh article packed with tips you won’t want to miss! 🚀 Read it here: {Post URL}.”
If you want, you can add some hashtags, like WordPress #LinkedInTips. But be sure they are suitable for all of your automated LinkedIn posts.
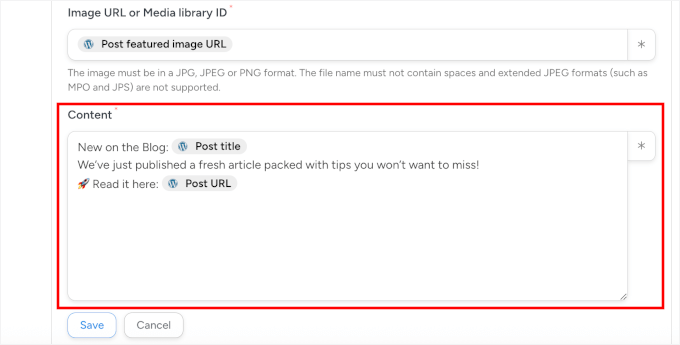
This way, your LinkedIn post will automatically include your post title and link, along with hashtags if you add them.
With that done, you can click ‘Save’ to store your LinkedIn auto-share action settings.
Step 5: Activate Your LinkedIn Automation Recipe
At this point, your recipe is complete and ready to automatically share your blog posts on LinkedIn.
But in the recipe editor, you’ll notice the switches are set to ‘Draft.’ That just means the automation is created but not active yet.
You can go ahead and switch all the toggles from ‘Draft’ to ‘Live.’
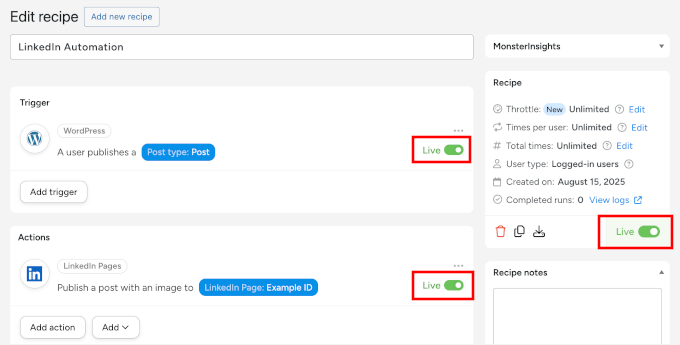
That’s it! Your recipe now runs in the background, taking care of LinkedIn whenever you publish new content.
Here’s what my demo automated LinkedIn post looks like:
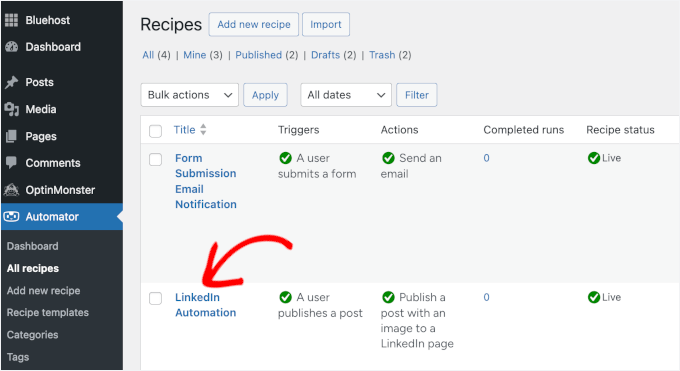
You can view all your active recipes by going to Automator » All Recipes in your WordPress dashboard.
From there, you can pause or update them anytime.
Bonus Tip: Grow LinkedIn Followers and Engagement with Giveaways
Running giveaways can also be a great way to grow your LinkedIn audience and boost engagement on your posts.
People love the chance to win something for free. And by tying the entry requirements to simple actions (like following your LinkedIn Page or engaging with a post), you can quickly expand your reach.
Here are a few smart goals you can set for your giveaway:
- Grow followers – Require entrants to follow your LinkedIn Page to participate.
- Boost post engagement – Ask participants to comment on or share your post on LinkedIn.
- Increase brand awareness – Encourage referring friends or colleagues who might be interested in your product or service.
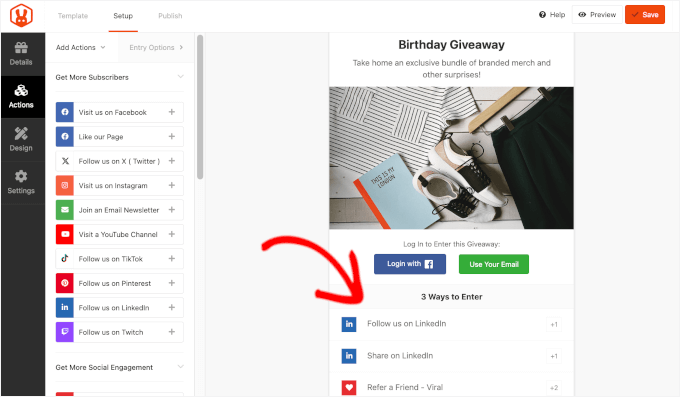
To run the giveaway, I recommend using RafflePress, which is the best WordPress contest and giveaway plugin.
We use it to run our annual WPBeginner birthday giveaway, and it’s been working super well for us. See our full RafflePress review for more insights about the plugin.
And for step-by-step instructions, you can see our guide on how to run a giveaway/contest in WordPress.
FAQs About How to Schedule LinkedIn Posts in WordPress
Still have questions? Here are answers to some of the most common questions I get about scheduling LinkedIn posts in WordPress.
How do I automatically post from WordPress to LinkedIn?
You have two main options for automatically posting from WordPress to LinkedIn:
- ClickSocial – Best if you want scheduling flexibility for LinkedIn and other social platforms.
- Uncanny Automator – Best if you prefer instant sharing directly from WordPress.
Both integrate smoothly with LinkedIn once your account is connected, giving you two simple ways to streamline your workflow.
How can I keep up with posting daily on social media?
The trick is batching and scheduling. Instead of logging in every day, set aside one block of time each week to write and schedule your LinkedIn posts. With the right plugin, you can line up a whole week’s worth of content and let WordPress handle the publishing.
Can I use the same content across multiple platforms?
Yes, but with a twist. You can repurpose your WordPress blog post for LinkedIn, X (Twitter), or Facebook. Just make sure to adjust the tone, hashtags, or image size for each platform so your content feels native everywhere.
What is the best post scheduler plugin for WordPress?
The best social media scheduling plugin really depends on your workflow. If you want an all-in-one, beginner-friendly tool that lets you plan and schedule posts across multiple platforms without leaving WordPress, ClickSocial is the way to go.
But if you’d rather automate things so your new blog posts go straight to LinkedIn, Uncanny Automator is the perfect ‘set it and forget it’ solution.
Can you add a LinkedIn feed to a WordPress site?
Yes, you can, but LinkedIn’s options are more limited than those of other social platforms. LinkedIn’s official tools don’t easily allow for dynamic, multi-post feeds like you can create for Instagram or Facebook.
The most reliable method is to manually embed individual posts by copying the embed code for a specific post directly from LinkedIn and pasting it into your WordPress post or page.
Keep Learning: Social Media and WordPress Tips
I hope this guide has helped you schedule LinkedIn posts in WordPress. However, this is just one way to boost your social media presence.
If you want to take your social media strategy even further, here are some more guides to help you get started:
If you liked this article, then please subscribe to our YouTube Channel for WordPress video tutorials. You can also find us on Twitter and Facebook.


